This is a collection of articles on maintaining and enjoying a Lazy Daze motor home.
Saturday, January 12, 2019
Replacing The Air Conditioner
Removal of the old unit is straight forward. It's all done from the inside. Four bolts hold it to the roof.
Installation was easy for me. Our strong son-in-law came over with his two young lads. We put a long ladder on the side of the RV. I put a sheet of plywood on the ladder and the ac on top of it. We tied a stout rope to the ac. That made it easy to pull the 90-pound ac up the ladder. He then dropped the new unit in the old hole.
There is very little tolerance to get the bolts aligned between the inside frame and the bolt holes. I tried to do it myself but I found if I needed to move the ac right an 1/4 inch I would overshoot by 1/4 inch. I got my grandson back on the roof to adjust the unit while I got bolts in the holes.
The install manual says the bolts should be tightened to 50 pounds. I know of no way to measure tightness on an uncompressed" sponge", the sealing gasket. So I tightened until I could see the gasket compressed about a 1/4 of an inch.
The electric junction box needed to be moved higher to accommodate the new style frame.
Wiring was no problem. Lazy Daze uses 14-3 copper wire. Dometic uses 14 gauge stranded wire. Stranded to solid wire can come loose, I made sure the stranded wire was long enough to wrap around the copper three times, put on wire nuts and taped them so they will not vibrate loose.
Connect the two 12 volt wires that were removed from the old unit to the wires on the new unit. Connect the "phone" connector that leads the thermostat to one of the two female connectors on the new unit. It may make a difference which one needs to be connected. If so, I guessed right.
Now connect the new thermostat. After you do a system reset, the system should work. The reset only requires thermostat be in the Off position, then holding the Mode and Zone buttons while pressing the On button.
If you had the older style analog thermostat that fit flush with the wall you will now have to make a larger hole to accommodate the new thermostat and two of the old screw holes will not be covered. The new style has a "bump" on one side of the backer plate that prevents flush mounting unless you make a hole to fit the bump into. I found I would have to cut into stringers on each side to do that. No way was I going to attempt that. So, I put some wood shims on the backer plate to balance it with the bump and screwed it in place. Yes, I can look sideways and see the screws, not professional, but it's the best I could come up with.
Caveat - The opening LD makes is dead on just enough to accommodate the new frame. There was no such frame on our old unit. A 1/16 of an inch less and I would have had to enlarge the opening. That said, I moved both the "phone" wire and 12-volt power wires out of the way of the forward bolts to prevent chaffing or worse from the bolts.
Monday, December 11, 2017
Cab AC - Air Flow Cuts Off Under Acceleration
You can test for a bad check valve by turning the engine off, waiting 30 minutes and then, without starting the engine, moving the HVAC control to a new position, listening for movement under the dash, indicating that stored vacuum is still present. If you hear nothing, good chance the check valve has failed. The HVAC controls should normally operate the controls after sitting a day or more.
[Note: The default vent setting is to the defrost vents. So the air is still flowing, it’s just not where you may want it. As an aside, you should set the vent control to off before turning off the engine in cold weather to keep air out of the passenger compartment]
The check valve/vacuum canister cannot be replaced by mere mortals. This why Ford charges $900 labor to do it.
You can Google for other DIY fixes, you will find thousands of hits. There are also YouTube's on the subject. I have not found any of them that speak to me. Of course, you may not find my fix to be understandable. Here is one from the Sportsmobile Forum.
The following describes a DIY procedure to save $900. In this procedure, we locate both ends of the hose and abandon the middle inaccessible section.
Parts:
Dorman Vacuum Reservoir
[If this is a dead link, Google for Vacuum Reservoir]
5 feet of 5/32 inch Vacuum Hose
On the E-series, the vacuum supply line runs from a port on the intake manifold, disappearing behind A/C components and exiting through the firewall near the passenger footwell.
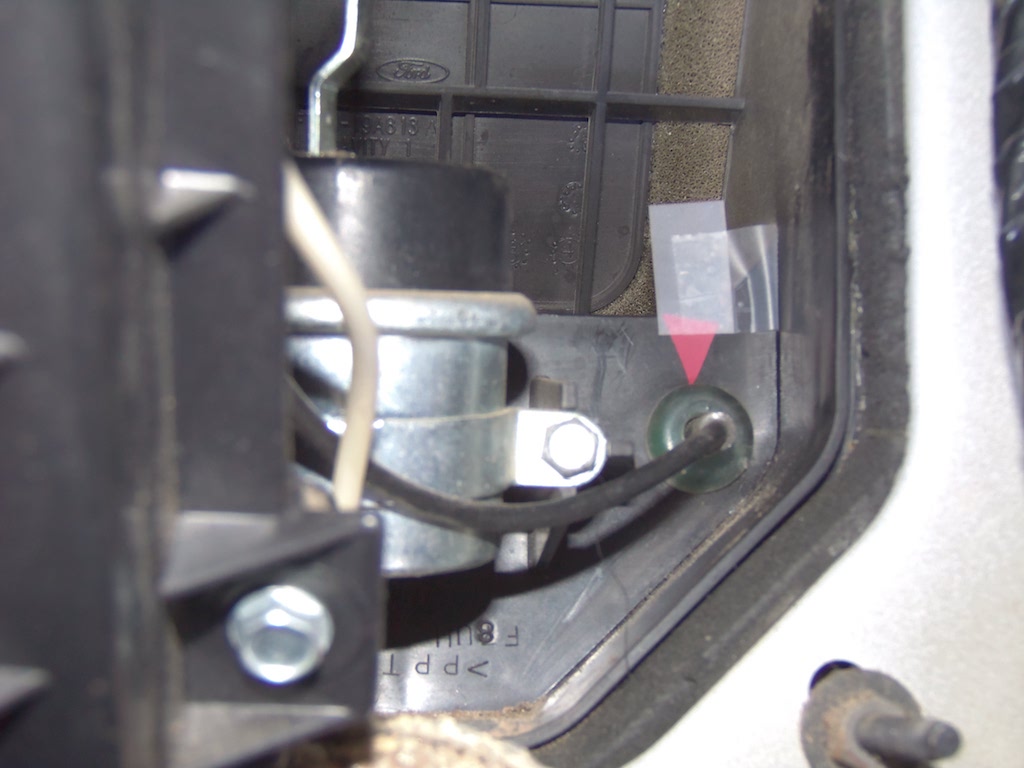
1) Look for a 1/8" black plastic hose. One end leads to the intake manifold. The other end leads toward to passenger side of the firewall.
Here is a photo with the hose marked with red tape.
We will return here later.
2) Pull the plastic cover off the right side of the passenger foot well to gain access to the other end of the vacuum hose. What you are looking for is marked with the red tape.
Closer
Cut the existing hose close to the firewall. With a small flat blade screwdriver, remove the plastic grommet protecting the hose from the firewall. This will allow you to pull the hose out an inch or so where you will find another fitting slightly larger than the grommet hose. Cut on the other side of the grommet. Say goodbye to the old hose.
3) Now snake something through the grommet hose to the other side of the firewall to be able to pull a new hose through the firewall. I found that my coiled fish tape was too flexible for this purpose. I used a 2-foot long metal shirt hanger straightened out with a U on one the leading side. The angle that worked for me was inserting it through the hole from a 2 to an 8 o’clock position.
For this step, you need to be over 6 feet tall or use a stool so you can see straight down behind the battery. The snake will exit the firewall below the battery. Follow the wiper fluid fill tube down and you will see an electrical connector on the firewall. The snake will exit below that connector. You will be able to see it, but not touch it. When the DW got the U on the snake where I could see it, I used another shirt hanger also with a U on the end and grabbed the other U and pulled it up.
Now you can pull the hose from the passenger compartment to the engine compartment. I made a slit in the hose and inserted the U in my homemade snake through it so it could be pulled through.
Now insert the 1/8 hose from the manifold into the 5/32 hose.
Start the engine and test for vacuum. It's not a big suck, but you can feel it.
4) The reservoir has an inlet and outlet nozzles, but it's not marked which is which. The 5/32 hose (the one you just pulled through the firewall fits one of the nozzles, but it's not the right one. Cut a short piece from the 1/8 hose you cut off, stick it in the 5/32 hose and the other into the cannister. Just reverse that for the other nozzle.
Don't overtighten any hose clamps, it easy to compress the 1/8 hose and cut off air flow.
You should now test for air flow from the dash vents.
5) Now you need to locate the reservoir out of the way of feet. I elected to remove the small vertical dash panel just in front of the seat. The dash panel is mounted to an easily removed steel plate. Pull the plastic gently from the bottom.
Behind that plate is a home for the reservoir. I used Dual Lock to secure it to a plastic cover. By using Dual Lock I can remove it if I ever need to.
Secure the hose with quick ties and button everything up.
6) Enjoy cool air from dash vents.
Sunday, July 24, 2011
Air Conditioner Tips
Here are a few things to consider. First, an RV air conditioner is only able to lower the temperature of air passing through it by about 25° F. If it's 100° inside your rig, you're not likely to get below about 75°. In other words, keep your expectations moderate.
An easy test for whether the air conditioner is working properly is to put a thermometer at the air conditioner's intake, measure the temperature there, and then do the same at its output. With the thermostat turned all the way to "COLDER," you should see a difference of 25° or so. If you do this on a hot day and only see a ten degree drop--or no drop at all--then there's probably something wrong with your air conditioner.
"One of your articles I read says to always run it on high to avoid condensation."
Condensation isn't a problem per se--that's normal, a result of the air conditioner removing excess humidity from the air. What is a problem is when condensation builds up so fast that it freezes on the cooling fins, blocking airflow and bringing cooling to a halt. You can usually tell when this has happened, because the sound becomes very muffled and not much air comes out even when the fan is on high.
Four things can lead to this condition: extreme humidity; turning the thermostat all the way to "COLDER," so that the compressor runs all the time; a low fan speed that results in low airflow; and (most common of all) a clogged filter that reduces airflow. When the weather is really hot and you're running the air conditioner almost around the clock, dust builds up remarkably fast, and you may need to clean the filter every two or three days to keep the air moving freely through it.
The remedy for a freeze-up is simple: switch the air conditioner to "FAN" and let it run as long as necessary--typically half an hour or so--for the ice to melt and the airflow to resume its normal volume. Meanwhile, you can be cleaning that filter. :-)
What if you need to replace your air conditioner? Well, the Lazy Daze factory is currently installing a 15,000 BTU Dometic air conditioner/heat pump--their spec sheet doesn't give a model number. However, any RV air conditioner will fit your rig, as they are all designed to go in a standard 14" x 14" RV vent opening. So if you see a good deal on a Coleman Mach air conditioner, you can buy it with confidence. You may or may not want to spend the extra money for the heat pump feature, which is only really usable in cool temperatures--not in freezing winter weather.
Andy Baird
Thursday, March 10, 2011
Trouble-Shooting Your Air Conditioner
Won't re-start
This is called compressor lockup. It happens if you turn the a/c off and then try to turn it back on again within two minutes or less. It can damage (burn out) the motor if you force it to try to turn a compressor that doesn't want to turn. That's why surge-protectors/power conditioner units such as the Progressive Industries EMS-HW30C that many RV'ers use include a two-minute-plus startup delay - to protect the air conditioner's compressor in case of a power loss and immediate restart.
If you're running your generator to power the a/c and shut the generator down and then restart it with the a/c still turned on, the same thing may happen. It may also trip the circuit breaker on the generator, so check that.
If you turn the compressor off by dialing the thermostat switch to a lower setting and then turn it back to a higher setting, the a/c may shut down. Wait several minutes before selecting a higher temperature.
Icing Up
If your Dometic air conditioner is icing up, check to see if your model has an ice sensor over the coils to prevent that from happening. Some sensors need replacing and some need to be checked for proper placement. If you are having this icing up problem, call Dometic and see they will send you a new sensor. Dometic may recommend placing the sensor in a different location across the coils. Also, check your Dometic manual for information on the sensor.
Leaks into Coach
Another quick test for a bad roof gasket is to pour a couple of gallons of water on the roof. Do this with the interior A/C trim removed so you can see an active leak up close and personal. If it leaks immediately, get up there and dry the roof with towels. If not, leave it for a longer test. There should be no leakage, no matter how much water is poured on the roof.
Some rooftop A/C's condensate drains cannot be easily accessed by just removing the shroud. These units require disassembling the top of the evaporator housing to get at the clogged drain(s).
One other cause of A/C leaks is the hold-down bolts. Check to make sure the bolts are tight.
Blows out small particles
My Dometic Brisk Air Duo-Therm air conditioner has recently started blowing out small dark gray particles. It happens both when cooling and when using the heat strip. Replacing the filter didn't help, and the old filter was in good shape (not disintegrating). The particles vary in size up to about 1 square millimeter. They're dry and leave no residue.
Solution: More than likely they are dust particles that have gotten past the inlet filter and built up on the fan blades. When built up enough (takes several years) they will break loose from the blades (and other surfaces in the airway) and blow out. Try removing the cover of the roof AC section to uncover the fan housing and wipe each blade. Also vacuum all areas in the airway. Maybe a new filter element a little larger might help after the cleaning.
Contributors: Ramon, Larry Wade, Chris Horst, Andy Baird, Edward A., Mike CoachmanRevised: 2 Nov 11
Friday, January 7, 2011
Removing Air Conditioner from Roof
Contributor: Linley
Return to FAQ Index
Measuring Air Conditioner Performance
It turned out to be cool, about 70-75 degree day. The local dealer noted that it was freezing up as A/C's may on a cool day and that the split temperature (the amount the inside air gets cooled by a trip through the A/C with the blower on high) was 17 or 18 degrees. Everyone said that the split temperature is supposed to be 19 to 21 degrees and the A/C was drawing about 11 amps. The temperature was almost OK, Dometic was slow answering my dealer's call and I needed the coach the next day so I settled for paying for (it was outside of warranty) a thermal switch to turn off the A/C compressor when it froze up.
I am a professional electronics engineer, but don't know that much about A/C. But after the dealer visit I understood what measurements to make and what they meant. So a week or so later when a hot day came I repeated the measurements. On a 90-95 degree day the split temperature had fallen to 15 degrees and the A/C was still only drawing 12 amps instead of the 15 it should have (with a 115V line).
The temperature measurements are easy to do. I made them with a Radio Shack automobile inside/outside electronic thermometer. The current draw measurements are harder. They were made with a clip-on ammeter in the coach's line cord with all other AC appliances turned off.
The ammeter has a set of jaws that close around the wire to be tested. It is intended for AC lines only (not DC) and is nothing special, you can get them at many hardware stores. It measures the NET current passing through the hole in its closed jaws so you must be able to clip it around just one of the wires. If you close them around the entire cord you will measure zero since there is as much current going as coming in the cord.
To make measurements possible I constructed an adapter consisting of a short extension cord that has the outer sheath removed. That way one can close the ammeter's jaws around just the hot, typically black, wire. My adapter was made out of 15amp hardware store electrical fittings, male on one end, female on the other connected together with a short piece of #12 three wire cord. I cut away the sheath in the middle of the cord, being very careful not to nick the insulation around the conductors and bent out the black wire so I could clip the ammeter around it.
AC units are specified at an outside temperature of 90 to 95 degrees so when the split temperature is specified as 20 degrees and I measure only 15, that means I was getting only 3/4 of the cooling capacity I had paid for. With the data in hand, I asked Steve at Lazy Daze to help me contact Dometic which he did. I talked to two people at Dometic the rep. Roger, and then the tech Al. They thought the most probable problem was that there was insufficient refrigerant in the A/C's system. The upshot was that Dometic authorized replacing the A/C, which was done last week by the same dealer as before at no charge.
Contributor: Linley
Return to FAQ Index