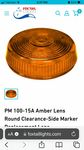
There are two styles. Round and rectangular. The latter was used in at least 2007 and forward both front and rear. The author of this article had a round lens on a 2000 model. The round style is a Peterson 102-15 series. The assembly is out of production. The lens is available from Fox Tail Lights. PM 102-15 A or R.
The front 5 clearance lights on my 2000 Rear bath were cracked and falling apart. Over time the housings will eventually crack and the screws used to install the lights will corrode. On my lights, the screws have so corroded a screwdriver would not be used to remove them, and some of the heads broke clean off.
Water Intrusion is a certain issue when the clearance lights get this bad, I can’t say after removing and replacing the lights that zero leaking had occurred, but I have zero signs of water damage on the interior paneling and it does look like lazy daze sealed some of the wires/screws from the inside and outside when the front cap was assembled.
The procedure is as follows:
1. Remove screws holding old clearance light in place, if the head cannot be accessed with a screwdriver I used “engineer screws extractor pliers”…they can be found on Amazon and are an absolute godsend with working with rusty screw heads.
2. Slowly break apart the old light housing around the sealant wiring, there is a significant amount of sealant so just cracking the housing in half (after snipping the wires) is necessary.
3. Pry as much old sealant from the wires as possible, on 4/5 of my lights it appears the wires have sealant applied from the opposite side of the end cap, so while there is zero chance of pulling some slack, there also was no chance of the wires going back and getting lost within the cap.
4. Take the new light fixture and drill/ream whatever sized hole was necessary to fit the wiring through, this varies as the lights have 2 butt connectors and a few strands connected, the does not matter how much of a hole you drill, as long as it is all sufficiently bedded in sealant.
5. Apply sealant behind the new fixture and around the wiring, and press the fixture into place. I screwed the fixture down with #8 screws at first but they didn’t hold as tight as I preferred, I swapped to #10 and actually used a #12 on one of the mounting holes that were stripped from me removing the old rusty screw.
6. If you are using incandescent bulbs polarity does not matter, so I attached 1 wire to the light housing/mounting screw with a ring connector, and attached the black provided wire with a waterproof twist-on butt connector.
Using a twist-on butt connector is likely the least reliable way to make this connection, but I choose waterproof (greased) versions. This allows me to remove the connector in the future if need be, since there is virtually zero extra wiring to work with, I avoided a permanent crimp connection. Likewise, because everything is so thoroughly packed in the fixture, very little movement will occur when going down the road. These wiring decisions could allow me to remove and replace the fixture again in the future without needing to cut the wiring.
7. Once all connections were made, inspected to ensure sufficient sealant is applied, then follow up with a layer of dielectric grease over the stainless screw heads, into any open wiring splices, and into the bulb socket. This step could double the life of these connections in regard to corrosion resistance.
The only concern I have with this whole setup is the lack of adequate water draining, the fixtures have a drain hole but it will not function once they are installed, and adding a drain hold in the ideal location would likely result in weakening of the overall fixture. I will monitor how much water enters and stays within the fixtures over the long term. Water allowed to stay in the fixture will freeze in the winter and cause cracking.
I have attached photos of the fixtures I purchased. They were surprisingly difficult to source in the required diameter, but these are the exact diameter as the Peterson manufacturing 100 series and the mounting screws fit up perfectly, the only modification required was to drill holes large enough and in the correct locations to bring the wiring through.
I would rate the difficulty of this repair pretty low on the spectrum, however, it is relatively tedious.
I would use LED bulbs. Color emitters to match the shade of the lens. These are available from Super Bright LED.
Red:
Amber:
They use less power, the bulb doesn't turn black as the tungsten filament coats the inside of the glass, and the color stays true if the lenses fade.