Solving Problems with the Door
Problem: The plastic latches that hold the door open break down over time or break if slightly mis-aligned.
Solution 1: Replace with metal latches. Check the alignment of the two parts and adjust as necessary.
I went to <http://www.soderbloom.com/>, clicked on "RV Catalog", searched for 'C-Clip' and found the part # to be "17620576" for a package of two metal C-Clips @ $2.94 per. Of course I paid $7 in shipping but I got what I wanted.
The 1st (of 2) has been installed and I suspect I'll never use the spare. One small problem, the screw holes are about 1/8th inch further apart than the plastic (OEM) part and so you have to ream them out to fit the holes already in the door.
In replacing the latch, you may find that the existing screws will not tighten in the door. Steve Newton says that these screws are just held by the 1/8" luan & fiberglass in the door. He suggested using larger screws. Replace with 3/4" x #10 screws as opposed to the existing #8 screws that come with the coach. .
Solution 2: Replace with different type latch.
You could try the plunger/socket type made of metal with a rubber insert on the socket side. These things last for years and are widely used on commercial trucks because they last. One of my parents travel trailers had this type door catch. The other type very common on trucks and RVs are the T-Holder type, one the other trailers my parents owned had the T-Holder type but I couldn't find an online picture of it. That type has a "T" shaped wire in a base that swings flush when not in use and the matching catch has a raised "T" shaped slot the "T" fits into to hold the door. The following links will give you a picture of them. They sell a few different brands though and others are less expensive (see link# 3) and a variation that folds back for travel (See link# 4) . These come in a couple sizes and either straight or angled. Vegas Trailer Supply is a Coast Distribution Systems dealer and there are several other Coast dealers on the go-rv.com website that are as well. If you get their catalog it will be a Coast Distribution System catalog and have most RV parts in it you'd ever need. All of these dealers also carry the "bumper" catch that looks like the LD storage compartment catches but have a rubber "bumper" on the top top that catches the door.
http://www.go-rv.com/online/1060/showproductdetails?catid=799
Problem: Locks have gotten "stiff".
Solution: "Lubricate" the lock.
The LD manual recommends the use of powdered graphite or a lubricant such as Tri-Flow, which contains Teflon. Some locksmiths say to NEVER use graphite powder in your locks. It ends up sticking together and forming a hard substance like the "lead" in pencils, which is actually graphite. This is made worse in humid areas where it happens quicker. They all recommend using WD-40 or a similar product because it both cleans and lubricates them.
Problem: Lazy Daze uses a high quality aluminum-framed door (wood framed doors are no longer available). Nonetheless, it is easily bent. If the wind catches the door, the door stop near the handle stops that part of the door, but the top and bottom keep going. Since the top of the door is weakened by the window, it's the most likely to bend. Once this happens, the top portion of the door no longer closes all the way.
Solution: Being aluminum, it's also easy to bend back.
According to Steve at Lazy Daze, the technique requires two people.
1. Close the screen door.
2. Place a short length of 2 by 2 against the door frame by the striker plate.
3. Close the door gently against the 2 x 2, such that the wood holds the door out by the 1 1/2-inch thickness of the 2 x 2.
4. One person firmly holds the bottom of the door in place -- no pushing involved, this person is simply holding the bottom of the door stationary.
5. The other person pushes gently on the top of the door until it is straight again. Be careful not to bend too far, otherwise the top and bottm will close, but the lock will no longer latch properly!.
The problem can be avoided by adding another door stop at the top of the door. It wouldn't need to be a latching type, just something to keep the door from bending again if the wind catches it.
Problem: Door latch squeaks
Solution: Lubricate the latch plate and opening.
Use some white lithium grease on the entry door security latch plate opening and on the door latch plate. The excess that one could brush against can be wiped off without causing the squeak to return. Repeat once every year or two, If you don't have access to the white lithium grease, a bit of Vaseline will work to quiet the squeak temporarily.
Problem: Can't lock lower latch.
Solution: Check springs in lock.
If you have the LD door lock below the deadbolt made by Bargman, remove the inside panel ( 2 screws ), and see if the 2 springs which preload the sliding striker plate are broken. RV dealers seem to only stock the complete lock for $130+. Ace Hardware has the springs for 40 cents each.
Problem: Door frame has loosened
Solution: Repair hinges
Actually there are two solutions - the first involves replacing the door, at a cost of $1200, not including paint and labor. This solution is MUCH cheaper and just as effective:
I discovered that the entry door frame had pulled loose from the inside edge of the door at the hinge plates on our 1999 26.5' MB. When I was at the Mothership in March I asked Vince about what it would take to replace the door. He replied that the doors are manufactured elsewhere and run about $1200 without paint and labor. Ouch! But then he told me that if I was handy I could repair it myself, and showed me how. I just finished the repair, so I thought I'd share the procedure with all of you in case any other doors out there are getting tired and need a frame repair at the hinge plates. If you'd like to read this along with pictures of the repair you can find it here.
The entry door Lazy Daze uses is a sandwich design with thin plywood on the outer walls, and a foam core in the middle. The repair consists of a threaded rod with furniture connectors on each end that run from the hinge plate through the foam interior, and terminates on the outside edge of the door. I did the middle and bottom hinge repairs with 1/4 20 threaded rod and nickel-plated furniture connector nuts.
The trick is to drill the holes for the furniture connector nuts, then heat the end of the threaded rod with a propane torch to get it nice and hot, insert it through the hole and just push it right through the foam to the other end of the door. (Thanks Vince, for that very helpful bit of advice!) The door frame at the bottom hinge was the most compromised, and was bent out pretty significantly. On this repair I started by attaching a furniture clamp and cranking it down until the door frame was straight. Then I drilled my holes and installed the treaded rod before removing the clamp.
On the top hinge the window blocks the path from the hinge plate to the far side of the door, so the rod for the top repair is only about 3" long. I didn't bother to remove the window because there is nothing underneath to anchor to but foam. Instead, I drilled a hole on the inside of the window frame opposite the hinge plate, which required a smaller nut than the 1/4 20 furniture connector nuts I used on the lower two hinges. I found some 10 24 screw posts at Parkrose Hardware, Portland's "real" hardware store, and used the female threaded ends to attach to the threaded rod, and ground off the edge of one of them to make it fit into the restricted space inside the window frame. Attaching one connector to each end with a short threaded rod in the middle did the trick.
The repair worked beautifully. The door is solid as a rock now and should last the life of the motorhome. Vince pointed out to me that the manufacturer of the door is now using this same threaded rod arrangement straight from the factory on their new doors. Apparently our situation was not an isolated one.
Contributors: Steve, Mike Richmond, Noel, Mike S, WxToad, Charlie Sattgast
Updated: 8 May 2013
Return to FAQ Index
Saturday, October 27, 2012
Thursday, October 25, 2012
Tow Vehicles
Any Jeep with 4WD can be towed without any restrictions. Unless you want to do off-roading, I would not opt for a Jeep. They get terrible gas mileage.
Perhaps the most popular toad is the CRV. It has enough ground clearance to do limited off-roading. It gets good mileage and it's a Honda. It has some minor tow restrictions, like not over 55 and the need to run the engine every 200 miles for a few minutes.
The Forester is another good toad choice for a Class C. It also has enough ground clearance to do more off-roading than the CRV. And goes like a rocket ship. For towing, you need the manual shift version.
We started out full timing about 4 years ago with a 2008 Chevy HHR. We came from the east and now spend all of our time out west. We thought we probably wouldn't have the need to drive on rough gravel and/or dirt roads. Boy were we wrong.
I spent a lot of time researching vehicles this summer. My criteria was high ground clearance, reasonably light weight, reliable and decent gas mileage and flat towable.
Most of the vehicles we considered were manual with the exception of the Honda CRV. The problem with the CRV was that they lowered the vehicle in 2007 from 8.1 to 7.5".
The Subaru Outback and Forester have 8.7". Mileage with the manual can get around 30 mpg although it is rated for 21-27. Weight is 3,250.
We purchased a 2011 Forester with 14,000 miles and have been thrilled. MPG has met or exceeded my expectations. The ride off road is very good and it is comfortable.
What I didn't research was all wheel drive. I assumed that they were all the same. After buying I found that the Subaru AWD is quite surprising in its ability to handle rougher terrain. If you are interested in that sort of thing check out Youtube for videos.
You might also look at this which is a comparison of AWD for various vehicles. Again there are others.
http://www.youtube.com/watch?v=0_MXK2nzt2Y&feature=related
Finally, if you care about this sort of thing as of 2011 they changed the engine to a horizontally opposed 4 cylinder which eliminates transverse mounting of the engine.
Finally, there are no limitations per the manual for flat towing. You hook it up, place in neutral, turn the key to acc and go. No limit on speed, no requirement to run the engine and no limit on distance.
Jim C
The Fit is light weight toad choice for paved roads.
"I have heard it is very difficult to install certain types of aux. braking systems in the Fit vs. the Jeep."
I originally thought that a Ready Brake couldn't be installed in a Fit, but I understand that it is indeed possible. My 2009 Fit has the US Gear Unified braking system, and that works just fine. (The solenoid is mounted way up on the firewall on the passenger side, so you can't see it and it doesn't affect foot room.)
Connecting to the vacuum booster didn't seem to be a problem for Mike Sylvester, who installed the US Gear setup. I do remember that the installation required removing a trim panel below the windshield. The way to do this is explained in Honda's service manual, which I had acquired from Helm before the work was done. not cheap at $125.00, but worth every penny! It's extremely detailed, unlike the Chilton and other third-party manuals. - Andy Baird
There is one couple here that tows a Model A.
Like most Class C, 27 foot V10 LD’s get about 9.5 miles per gallon. The tow penalty is about 1mpg.
Eternabond
Roof seams need to have the seals renewed periodically to prevent water from getting into the wood framing and causing rot. If a LD is properly sealed, the coach will last for decades, if not, rot can destroy a coach's frame in just a few years. The roof seams done at the factory last about ten years. When it's time, you have two choices return to the factory or use Eternabond.
Eternabond is a 4"-wide self-adhesive tape, available in either white or aluminum finish (paintable). "Adheres to almost any surface (except silicone) instantly and permanently. Will not harden, shrink, streak or ooze," says the description.

The advantage of Eternabond over Parlastic is that you can reportedly apply it over an old seam with proper preparation--whereas with Parlastic, you must clean off ALL the old sealant, right down to the metal. Those who have done it say that's a real PITA job, with lots of time spent on your knees scraping off the old hardened stuff, applying nasty solvents and scrubbing away the remainders.
The key to a lasting Eternabond application is to do a thorough and painstaking cleaning and surface prep process; the prep takes time, it's "steppy" and tedious, it's hard on the knees, and there are no "do-overs"! If the surfaces aren't very clean and well-prepped (or if the E-bond is applied over an "incompatible" surface), and/or the tape isn't rolled or stuck down carefully, the stuff will lift and/or bubble and the seal can fail.
It's absolutely true that E-bond is a nightmare to remove; if the job is well done in the first place, that's pretty much the point! And, I can surely see what a shop would *not* want to take on the job of removal; even a bad seal job is still a one big time-consuming, labor-intensive mess to take off! But, as to that "never" stuff, I first applied a strip of Eternabond over five years ago to the cabover roof seam because the factory seal had been sloppily done; the seam had bubbled and "leaked" and allowed water and dirt to collect under the seal. I cleaned the seam out, scrubbed and prepped it, ran a deep "bead" of polyurethane sealant, let that dry and "cure", prepped the seam lightly again, and applied the E-bond tape. When I did the roof reseal this spring, this tape showed no lift or other evidence that it had lost integrity, but it *was* weathered and showed a few light surface cracks along the outer edges, and a few of the machine screws had begun to poke through the tape. I fixed those and resealed the seam with another strip of E-bond.
The first major decision you will need to make is whether to put the Eternabond over the existing caulking or to strip off the existing caulking before applying the Eternabond.
Eternabond Installation over existing caulking:
Recommended Equipment:
(1) Two 50’ rolls of Eternabond, 4” wide
(2) Ladder high enough so you can safely reach the edge of the roof. Mostly I worked on the roof, but sometimes, like around vents, the ladder was easier.
(3) A wallpaper seam roller, about 1” wide
(4) a nice sharp razor knife
(5) A pair of sharp scissors.
(6) A can of Acetone
(7) Some rags.
(8) A scrap piece of wood to use as a cutting board when trimming the tape.
(9) A tape measure
I’ve done this twice, first on our 2000 then on the ’08. Both times the job turned our just fine. No lifting of the tape, no air bubbles, etc. Basically I followed the Eternabond instructions carefully.
“Side seam” refers to the long front-to-back seam on each side of the LD. “Front seam” refers to the seam where the nose cap joins the aluminum roof.
1) Use soap & water to wash the roof. Let if sit to be sure it’s absolutely and totally dry.
2) On the day of installation there can be no dew on the roof. I started around noon time to be sure the roof was really, really dry. Eternabond will not adhere to water!! If there is moisture under the tape, as soon as it gets hot, the water will evaporate and a bubble will form.
3) On installation day, I cleaned the area to be taped with acetone just before I taped that specific area. Acetone dries instantly. It’s a cleaning product recommended by Eternabond.
4) Neither Eternabond, nor I, saw any need to remove the existing caulk. I suppose if some was obviously loose, I would, but that was not the case with either of my applications. Both jobs came out well; based on that, I’d say removing the existing caulk is overkill of the highest order. Now if some previous fool used silicon on the roof, that’s a different story. Nothing, Eternabond included, sticks to silicon. When you tape over the existing LD caulk and use the seam roller, you will see some ridges or bumps under the tape here & there. Not that it matters or adversely impacts the results, but there are some ridges. If you simply can’t live with the occasional bump, them by all means feel free to remove all existing caulk.
5) When actually laying the tape, just peel back a few inches of the tape liner at a time. Get it exactly lined up, then press in place with your fingers. Roll it tight with the seam roller. The tape makes contact the very instant it touches the roof. Just like using contact cement; you only get one chance to get it right. If it’s a little crooked, not to worry, just get back on your line with the next few inches you apply. The Eternabond instructions address how to deal with little air bubbles should you wind up with some here & there.
6) Start with the long side edge seams. Lay the tape from front to rear. There are two ways to help get this side seam straight. If you have a good “eye” you can just use the existing seam as your guide. Or, use a chalk line and pop a line just where you want the inside edge of the tape to be. I used a chalk line. Even so, there is a bit of a wave in my long side seams. Doesn’t look like a snake, but nor is it perfect. Then again, you need to climb on the roof to see the tape. Mostly that’s just me. That’s why I went with the 4” wide tape. It’s more forgiving then the 2”. Plus the 4” gives a nice 2” coverage on each side of the seam, and in the grand scheme of things, it’s not all that much more then the 2”. The reason you lay the long sides first, is that the front exposed edge of the side seams should be covered so highway speed wind & rains don’t try to lift it up. I placed the front edge of the side tape so the leading edge of the tape was about 1 ½” in front of the front side-to-side seam. That is, the seam where the nose cap & the aluminum roof meet. That way, when I laid the across- the- front tape, it covered the front seam by 2” in front of the seam and 2” in the rear.
7) Working around the refrigerator “chimney” and other vent obstructions takes a little doing. I laid the tape in it’s full 4” width as close to the chimney as possible. I then used the scissors to cut the tape on the inside roof side, just enough to permit me to continue with the run past the chimney. I didn’t remove any tape, I just folded the tape up into an “L”: shape. The bottom of the “L” adhered to the roof; the upright part of the “L” to the upright edge of the chimney. That way there is no seam in the tape itself. Its one solid piece as it passes the obstructions. I used the same general procedure around the different roof vents. Applied the tape up the entire upright part of the vent then the remainder to the roof.
8) I used Eternabond everyplace Lazy Daze used caulk, i.e. around all roof vents, vent stacks, etc. 50’ was just enough.
9) Sometimes the glue from the tape will stick to the razor knife or scissors. Acetone will clean it off.
Removing caulking before installing Eternabond:I was going to Eternabond a 1992 LD when I found that the Factory seam had been generously coated with a coat or two of trailer roof sealant.
The trailer roof sealant barely dissolved when trying all the solvent I had on hand. I also found big rusty hole, under the sealant, in one of the front corners, an area prone to leaks. So the choice was made to remove it all off.
I had bought Rockwell Vibratory tool several months ago for another job and had wondered about how well it would work for removing roof sealant.
http://rockwelltools.com/RK5101K.htm
I installed a sharp scrapper blade and started slicing and wow!,this thing moves.
It took about two hours of actual work (and a couple water and sharpeningbreaks)to remove the big stuff plus another hour of using a grinder to buff off the remaining sealant. Most of the surface was cleaned down to bare metal. The roof then got two lacquer thinner scrubs, a etching solution treatment, was washed and dried, wiped again with lacquer thinner and was then allowed to bake in the sun. Next a thick bead of 3M-5200 sealant was applied to the all exposed seams and pushed in and smoothed with a gloved finger.
The Eternabond was then carefully applied, trimmed and rolled. Any remaining bare metal was painted.
The whole job took 6-7 very busy hours.
http://www.flickr.com/photos/lwade/sets/72157624693172984/
------
I spend the last 2 days putting eternabond tape on the main seams (2 side, 1 front) on my 2003 MB. The caulk was original, but still in very good shape because the previous owner kept it inside much of the time. I opted to strip all of the original caulk off, which I know many would consider overkill. In my case, the original roof had been painted with a self-leveling rubber non-slip surface to fill some dents from a hail storm. I wanted to get to bare metal as much as possible. I also believe that for a once-in-a-lifetime job like eternabond, it's best to err of the side of surface preparation.
Random thoughts:
(1) I'm glad my LD is only 26.5' long.
(1.5) 26.5' is longer than you think.
(2) Caulk sticks to caulk better than it sticks to painted aluminum. This means you can pull/peel it off of you can get a grip.
(3) a 5-in-1 paint tool was very helpful for getting a grip and helping peel caulk over screws. A plastic putty knife was too soft, and a metal putty knife was too thin and sharp. The 5-in-1 was solid and not too sharp.
(4) A heat gun actually made things worse. The caulk tore too easily and I couldn't peel/pull it off in substantial strips. Heat + scraping left thin layers of caulk on the metal, while pulling left the painted metal clean.
(5) Heat from inside the coach did make things easier. I could tell a difference in the afternoons when the interior heated up, and I could tell a difference around the refrigerator vent.
(6) Working from a step ladder was easier than working on the roof.
(7) A laminate roller works great for rolling the tape. I had one from a previous counter top job, and they are available at any home improvement store. The laminate roller is similar to the roller sold on the eternabond site, but much easier to acquire.
(8) 2 50'x4" rolls gives plenty to do both side seams, the front seam twice, and still have enough left over for the vents.
(9) I'm a young, strong guy and I'm sore after peeling and pulling for 2 days. Removing all of the caulk is a chore.
(10) I plan to tackle all of the vents and roof rack mounts in the spring. That should be easy after handling the main seams.
(11) I'm very glad that this job will last the life of the coach.
Contributors: Larry Wade, Rich
Revised 2 Aug 11
Return to FAQ Index
Water Pressure Regulator
Experienced RV owners always use from the fresh water tank. Other’s don’t understand the risks of connecting to city water. Still others opt to ignore the risks. If you must connect to city water, you should invest in a Watts type pressure regulator. Not using one will eventually led to a very wet floor.
Looks like this. Costs about $60. Regulates pressure, not flow.

PPL is one source for them.
Saturday, October 20, 2012
Generators – Trouble Shooting
It's easy to take your generator for granted - all you have to do is push a button and presto, you have 110 V AC power. But then once in a while, it's not quite so "presto". You push the button and you're not rewarded by the sound of the genset operating.
The first thing to remember is that generators do better when used more often. It is highly recommended that you "exercise" the genset at least once a month for an hour under at least half load. This helps prevent the carburetor from getting gummed up.
There are two sections in this article - The generator will not start and the generator starts, but produces no power.
1. Before starting, hold the switch in the STOP (down) position until the green light comes on. You may hear a faint rattling noise as the fuel pump pulls gasoline from the tank.
2. Release the button when the green light comes on, and press and hold the switch in the START (up) position until the generator catches, then release it.
If the button is pushed and there's no cranking or starting noises - - suspect a dead battery or loose/corroded connections.
If the button is pushed and there's only a clicking noise - - low battery, loose connections, or faulty starter solenoid (relay or contactor - same thing).
If the button is pushed and the engine cranks normally but doesn't start - - low or no fuel reaching the engine, faulty ignition system, low oil cut-off, gummed up carb, etc.
If it has a little vibration or hesitation: Try cleaning the spark arrestor. This is a plug that is in the muffler-like exhaust under the units, Its not the regular muffler but one that is under the unit. Some have one plug some have two. Unscrew the plug and start the unit, let it run for 15 minutes, shut off and re-install the plug.
The plug may be difficult to remove. Heating it should help break it loose. If you want to try penetrating oil, PB blaster is highly recommended; it's a penetrating catalyst and a magnetic lubricant.
Refer to the Onan Owner's Manual for deciphering the trouble codes that the generator displays.
Try the start switch on the front of the generator - if it starts there, the start switch/wiring is the culprit. If it does not then the battery feed to it could be one issue. Can you measure 12 volts at the gen from the line(s) that comes to the battery? It is a large wire that comes up from the lower right corner of the gen box. Connects to a large stud on the start panel.
Check the circuit breakers. They are self resetting but can go bad. You can check to see if they have 12 volts on each side of the lugs. I think LD runs 2 lines over the gen to get the right staring current applied the gen. If you only get 12v on one side of the switch (s) then the switch(s) is bad. If you don't measure 12volts on each side of the switch, then the line(s) between there and the battery need to be looked into. They should be connected to the battery.
Are your house batteries fully charged? Are the battery connections clean and tight?
There is a small possibility you have lost ground to the gen box or the gen itself. There is a braided ground strap near the base-plate mid gen. You would probably have to take the gen out to get a good look at it on yours. You could always check continuity from a bolt on the gen case to the mounting plate to see if the ground strap still works.
Contributors: bumper, oldtrucker63, Ramon
Revised 1 Jul 11
- Check all the electrical breakers. Not only are there breakers inside the front cover to the converter/charger, there is also a breaker located on the generator. Turn it all the way off and then back on. If the microwave and/or AC were turned on when you started the generator, the load may have been too much and tripped that breaker. It's better to ensure all power-hungry appliances are turned off before starting the generator.
- There is an Automatic Transfer Switch that switches the rig's 120V source between generator and CG power. Verify that yours is working.
- Do you have a "whole house" surge protector? There is usually a delay of a couple of minutes before it will allow power through it.
-----------------------------------------------------------------------------------
Unless you are pretty comfortable working on equipment, including 110v power systems, replacement is best done by a service person. Assuming you are comfortable here are the steps:
1) Remove the front of the service panel and cut all power - shore, solar, and batteries.
2) Using a multimeter, verify that everything in the panel is dead - no voltage anywhere.
3) Unscrew the four screws that hold the panel in place and slide it out until you can see the back.
4) The metal box on the back is the ATS. On the very back near the bottom of the ATS is a screw. Remove that screw.
5) The back and top of the ATS will now slide up, exposing the ATS connections.
CAUTION - steps 6 to 10 involve checking voltages on live, exposed circuits. DO NOT TRY THIS UNLESS YOU KNOW WHAT YOU ARE DOING!!!
6) Turn on the generator.
7) Screws 1 and 6 are for the power from the ATS to the panel. Screws 2 and 5 are from the generator to the ATS. Screws 3 and 4 are from shore power to the ATS. Check voltage between 2 and 5.
8) If there is no voltage, or if significantly other than 110v, you have either a generator problem or a wiring problem from the generator to the ATS.
9) If there is 110v between 2 and 5, check the voltage between 1 and 6. If you read no voltage you have a bad ATS.
10) Turn off the generator and put everything back together.
11) If the ATS is bad, order a new one and install it when it arrives.
12) If the ATS is not the problem, and your generator is not delivering voltage to the ATS, and the breaker switch on the generator is closed, you need a generator service person.
Contributors: Alex Rutchka, Doc, JC, Ken F
The first thing to remember is that generators do better when used more often. It is highly recommended that you "exercise" the genset at least once a month for an hour under at least half load. This helps prevent the carburetor from getting gummed up.
There are two sections in this article - The generator will not start and the generator starts, but produces no power.
Generator Will Not Start
Starting in 2002, the Onan MicroQuiet replaced the Onan Emerald Plus. The Microquiet has a prime function on the Start/Stop switch on the range hood. This feature was not documented in the LD Owner’s Manual until 2007.1. Before starting, hold the switch in the STOP (down) position until the green light comes on. You may hear a faint rattling noise as the fuel pump pulls gasoline from the tank.
2. Release the button when the green light comes on, and press and hold the switch in the START (up) position until the generator catches, then release it.
If the button is pushed and there's no cranking or starting noises - - suspect a dead battery or loose/corroded connections.
If the button is pushed and there's only a clicking noise - - low battery, loose connections, or faulty starter solenoid (relay or contactor - same thing).
If the button is pushed and the engine cranks normally but doesn't start - - low or no fuel reaching the engine, faulty ignition system, low oil cut-off, gummed up carb, etc.
If it has a little vibration or hesitation: Try cleaning the spark arrestor. This is a plug that is in the muffler-like exhaust under the units, Its not the regular muffler but one that is under the unit. Some have one plug some have two. Unscrew the plug and start the unit, let it run for 15 minutes, shut off and re-install the plug.
The plug may be difficult to remove. Heating it should help break it loose. If you want to try penetrating oil, PB blaster is highly recommended; it's a penetrating catalyst and a magnetic lubricant.
Refer to the Onan Owner's Manual for deciphering the trouble codes that the generator displays.
Try the start switch on the front of the generator - if it starts there, the start switch/wiring is the culprit. If it does not then the battery feed to it could be one issue. Can you measure 12 volts at the gen from the line(s) that comes to the battery? It is a large wire that comes up from the lower right corner of the gen box. Connects to a large stud on the start panel.
Check the circuit breakers. They are self resetting but can go bad. You can check to see if they have 12 volts on each side of the lugs. I think LD runs 2 lines over the gen to get the right staring current applied the gen. If you only get 12v on one side of the switch (s) then the switch(s) is bad. If you don't measure 12volts on each side of the switch, then the line(s) between there and the battery need to be looked into. They should be connected to the battery.
Are your house batteries fully charged? Are the battery connections clean and tight?
There is a small possibility you have lost ground to the gen box or the gen itself. There is a braided ground strap near the base-plate mid gen. You would probably have to take the gen out to get a good look at it on yours. You could always check continuity from a bolt on the gen case to the mounting plate to see if the ground strap still works.
Contributors: bumper, oldtrucker63, Ramon
Revised 1 Jul 11
Generator Starts, but no Power
Generators are wonderful things to have sometimes.....when they work. In a previous LDC article we discussed generators that won't start. We go a step further in this article and present some trouble-shooting tips for a generator that starts and runs, but is not putting out any electric power.- Check all the electrical breakers. Not only are there breakers inside the front cover to the converter/charger, there is also a breaker located on the generator. Turn it all the way off and then back on. If the microwave and/or AC were turned on when you started the generator, the load may have been too much and tripped that breaker. It's better to ensure all power-hungry appliances are turned off before starting the generator.
- There is an Automatic Transfer Switch that switches the rig's 120V source between generator and CG power. Verify that yours is working.
- Do you have a "whole house" surge protector? There is usually a delay of a couple of minutes before it will allow power through it.
-----------------------------------------------------------------------------------
More:
First, make sure that the switch on the side of the generator has not opened. Your manual will show you where it is. Assuming that the switch is closed, the next question is what is the status of the breakers in your service panel. Try to reset the main breaker. Still no power? If not, (and this was my issue, solved with Andy's help) you may have a bad Automatic Transfer Switch. The ATS is located behind, and attached to, the main breaker box. Replacement can be a real headache, but that is the only way to deal with a bad ATS.Unless you are pretty comfortable working on equipment, including 110v power systems, replacement is best done by a service person. Assuming you are comfortable here are the steps:
1) Remove the front of the service panel and cut all power - shore, solar, and batteries.
2) Using a multimeter, verify that everything in the panel is dead - no voltage anywhere.
3) Unscrew the four screws that hold the panel in place and slide it out until you can see the back.
4) The metal box on the back is the ATS. On the very back near the bottom of the ATS is a screw. Remove that screw.
5) The back and top of the ATS will now slide up, exposing the ATS connections.
CAUTION - steps 6 to 10 involve checking voltages on live, exposed circuits. DO NOT TRY THIS UNLESS YOU KNOW WHAT YOU ARE DOING!!!
6) Turn on the generator.
7) Screws 1 and 6 are for the power from the ATS to the panel. Screws 2 and 5 are from the generator to the ATS. Screws 3 and 4 are from shore power to the ATS. Check voltage between 2 and 5.
8) If there is no voltage, or if significantly other than 110v, you have either a generator problem or a wiring problem from the generator to the ATS.
9) If there is 110v between 2 and 5, check the voltage between 1 and 6. If you read no voltage you have a bad ATS.
10) Turn off the generator and put everything back together.
11) If the ATS is bad, order a new one and install it when it arrives.
12) If the ATS is not the problem, and your generator is not delivering voltage to the ATS, and the breaker switch on the generator is closed, you need a generator service person.
Contributors: Alex Rutchka, Doc, JC, Ken F
Sunday, September 2, 2012
No AC or DC Power
The situation: you are hooked to 110VAC but none of the 12DC appliances are working and the battery is down below 11 volts. Just as a check for the 110VAC power, make sure the display in the microwave oven is lit and that the air conditioner fan runs (i.e. at the start of a problem, look for the simple things and don't assume ANYTHING).
Both the refer and furnace always need 12volts to operate. Hooked to shore power or not.
If you do indeed have 110VAC power in the coach, it is apparent that the converter is not supplying power to the 12DC buss and the battery is now discharged. Check again to make sure all the circuit breakers in the power center are on. The handle of a tripped breaker can be wiggled up and down. A breaker is on when its handle is up. If a handle wiggles, push it down to the off position and then push it up.
Assuming that, that doesn't cause the voltage readout in the solar controller to read above 12 volts, it's time to check the fuses in the DC fuse panel. The two 30 amp fuses at the top of the panel are between the converter and the coach's 12VDC bus. Check to make sure BOTH of them are good. (They are in parallel so if one fails, the other will normally blow.)
If you 1) have 110VAC power, and 2) the 30 amp DC fuses are good, and 3) the DC voltage is still below 12 volts, there is a good chance the converter has packed up. Before we jump to that conclusion, there are some other things to look at before we are completely sure.First, do you have solar panels? If you do, and the sun is out, they should be providing some current and should keep the DC voltage higher than it might otherwise be. Does the solar panel controller show that there is current being sent into the system?
Second, if you start the coach's engine, does the voltage on the DC bus rise to something well over13 volts? IF the answer of either of these questions is no, then something else is either the problem or perhaps something else has failed at the same time (collateral damage?). For instance, there is a chance that the breaker between the battery and the DC distribution panel is open or that the solar panel fuse is blown. The breaker is typically in the back of the battery compartment or is accessed by removing the drawer below the refrigerator in a midbath and
perhaps other floor plans.
When you have 110VAC in the coach, if the converter is working, for coaches delivered after mid November of 2001, the voltage of the DC system should
be about 13.8 volts. That's the converter's nominal output voltage. (Earlier coaches have a different converter so the next two paragraphs do
not apply.)
But, even if it's working correctly the voltage may be something above or below 13.8 volts "for awhile". For instance, if you have been driving for
awhile and/or you have solar panels under a bright sun the battery's voltage may be higher than 13.8 V for "awhile" after you stop or until the
sun goes down. Then, the voltage should decrease to 13.8 volts.
On the other hand, if the battery is well down as you plug-in to 110VAC, even if the converter is working the voltage will not instantaneously jump up to 13.8 Volts. A working The converter, will put ~30+ amps into the battery which will cause the batteries voltage to jump up but it will not immediately reach 13.8 Volts. After "awhile", that is, as you watch, the voltage should rise bit by bit to 13.8 volts.
Note how useful a simple $10 multi-meter is for trouble shooting. First of all, if you don't have a built in solar panel controller voltmeter you can use a multi-meter to measure the DC bus voltage by measuring across those big square terminals at the lower right of the DC fuse panel. Knowing the DC bus voltage then you can then compare it with the voltage across the battery's terminals to see if the DC breaker is tripped. Or, one could measure to see if there was any appreciable voltage drop across the 30 amp fuses in the DC fuse panel to see if they are blown. Another use would be to pull the 30 amp DC fuses and measure from the top open terminal of one of them to the big square ground lug to see if the converter is making DC at all. Multi-meters are a really useful tool when trouble shooting.
Linley
Monday, August 27, 2012
Road Service
If you're depending on AAA for emergency road service for your motorhome, you're taking a risk. Most AAA franchisees are not equipped to deal with anything bigger than an SUV. At best, they may not be able to help you... and at worst, they can damage your RV by trying to tow it with inadequate equipment and/or unqualified personnel. In addition, last time I checked, AAA's RV coverage was not valid in every state, or even every county. Check the fine print of your contract for weasel wording. ;-)
I strongly recommend against using AAA for RV road service. I've seen too many horror stories over the years. Coach-Net or Good Sam RV road service can be depended on to send a truck that can safely tow the largest RV. And with Coach-Net, their dispatchers are trained RV techs, so you're not just talking to some clueless minimum-wage operator. From my experience, I recommend Coach-Net.
Andy Baird
Thursday, July 19, 2012
Drawers Will Not Lock
A common problem with the drawers in our LD's is that over time they get to the point where they will not stay closed when you're underway.
There seem to be two problems, either of which results in this problem.
In the first case, there is a problem with the tapered stop on the underside of the drawer. If the drawer goes as far back as you can push it, but is still able to rock from side to side, then that conical latch is not engaging.

Shorten it just a little as described, and the drawer should latch. Use a Dremel or similar tool with a cutoff wheel to remove a 2mm sliver from the large end of the tapered cone. Doing this lets it go past and then drop down over the retainer tab on the cabinet-mounted slide.
Another possible problem is that over time the drawer slides can get bent and prevent the drawer catch from working properly. Heavily loaded drawers are more prone to this. So when drawers start popping open too easily, pull the drawer out and check the slide parts for straightness.

In the past, straightening the slide would allow the drawer to lock again. During our last major trip, one of the kitchen drawers completely refused to lock anymore.
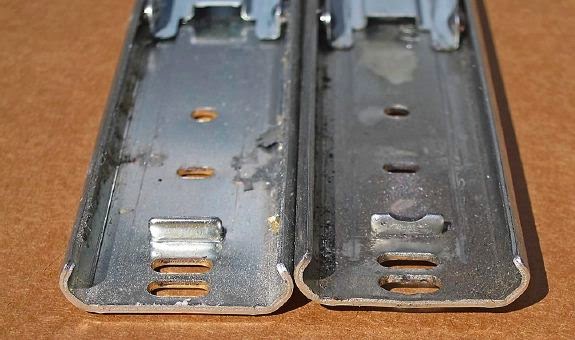
On inspection, I could see that the metal tab in the outer slide part that the inner slide catches on to lock had a groove worn in it from several years of use (new slide on left, old on right).

The combination of the groove and the bow of a bent slide, meant that the lock wasn't close to catching.
We recently had a trip that allowed us to swing by the factory, where I picked up new slides for our kitchen drawers. Since I've gotten home and replaced those slides, I've looked up the parts to see that they are available MUCH CHEAPER online. So if anyone has reason to replace slides themselves, they are an Accuride 1029 Center Mount Slide. Just measure your old slide and order the correct length.
Of course, it would be nice to prevent the slides from bending in the first place. For upper drawers, that can be accomplished by screwing a length of 1"x2" fir to the bottom side of the track. For the bottom drawer, you can insert a small brace between the floor and the bottom of the slide. Here is how Larry did it:

Contributors: Andy Baird, Art, Larry Wade
Revised: 23 Aug 2014
Tuesday, July 17, 2012
Propane Tank Rust
My propane tank has some rust spots on it. Most are tiny and superficial, but there is one about the size
of a quarter that is all rust, no paint, and rough to the touch, plus the paint around about half of it is blistered a bit, making me thing there is rust under there too.
My inclination is to wire brush and then sand these spots to see how quickly I get a smooth bare metal surface. Then, if the rust is shallow (i.e., no noticeable indentation vs the surrounding surface), treat with a rust inhibitor paint, prime and top coat with white Rustoleum.
So, I'm just wondering if others have experience with this and any recommendations. Thanks.
Terry, Gardnerville, NV
I want to thank everyone who replied to my post below. I began work today, scraping and wire brushing the rust spots on my propane tank. There was more rust than I previously thought, probably 10 or 12 sq. inches altogether. The paint chipped off the rust spots fairly easily. I then wire brushed those spots and sanded the whole lower half of the tank, cleaned it with paint thinner and then cleaned that off.
I then treated the rusty spots and surrounding paint with Rustoleum Rust Reformer. This "converts" the rust to something that won't rust further and seals everything. It's flat black. Next steps will be to spray the whole bottom half of the tank with Rustoleum Stops Rust flat white primer and then top coat that with Rustoleum Stops Rust gloss white paint.
Terry, Gardnerville, NV
Here is another issue that I have been running into on LDs that are a few years
old. Many, if not most LD's, with horizontal, frame-mounted propane tanks, have
rusted bottoms, with the rust extending up the sides of the tanks, under the
paint.
I found a third of the propane's tank covered in rust. I scrapped all the loose paint and rust off
and treated it with Naval Jelly and then two coats of hammertone enamel paint.
A couple summers ago, I found almost all the paint missing from a 2003 East
Coast LD's propane tank. Road salt may accelerate the problem.
The tanks have what appears to be an epoxy coating applied over a surface that
was not prepared correctly.
You might want to take a look at your tank to see if it is suffering from this
condition.
The best cure I have found is to scrape every bit of loose paint off, treat with a rust converter, like Naval Jelly, and then give it a couple coats of a durable paint.
Rust never sleeps.
Larry
Just to clarify, Naval Jelly is not a rust *converter*; it's a gelled acid rust *dissolver*. While effective for removing heavy rust deposits, it must be thoroughly washed away after use, or it will promote future corrosion. Even after it's been removed, the resulting surface is just as vulnerable to rust as bare metal.
In most cases of light to medium rusting, a better bet is a converter product such as Rust-Oleum 215215 "Rust Reformer":
http://www.amazon.com/gp/product/B001DEL6J6/ref=as_li_ss_tl?ie=UTF8&camp=1789&creative=390957&creativeASIN=B001DEL6J6&linkCode=as2&tag=andbai-20
Products of this type actually *convert* rust to a chemically inert form, leaving a barrier that prevents further rusting. To work properly, they need some rust to convert, so the instructions typically recommend removing excessive loose rust, but leaving a thin layer of rust, then applying the rust converter liquid.
Andy Baird
http://www.andybaird.com/travels/
Andy
I have used rust converters and dissolvers and both, in my experience, do a good job as long as the directions are followed.
Naval Jelly removes the rust and allows the fresh paint to get a good grip, a sort of chemical sandblasting. Apply it liberally, allowing time for the acid to creep under the chipped edges, where the rust is actively expanding. Then scrape the area well with a heavy wire brush or stiff putty knife to remove any loose paint. Wash the surface well and wait until dry before top coating.
Whatever method is used, be sure to re-inspect the area periodically and touch up fresh chips, they will continue to occur.
Larry
Broken Drawer Guide
The drawer rails/guides that LD uses often lead to some issues with drawers not opening or not staying shut. Heavy contents can cause failure of the brackets. Solutions: beef up the existing brackets or replace the rails/guides completely.
Strengthening the existing guides:
The drawer guides are apparently meant for socks and underwear, so if you load them with wrenches and hammers the way I do, the brackets are under a lot more stress than they were designed for.
In every case I've seen, the break was at the right-angle bend in the rear support bracket. The forming process must embrittle that area. Fortunately, the fix is fairly easy. You need a 1" x 1" corner brace, two #8-32 x 1/2" machine screws, and two each #8 star washers and #8-32 hex nuts, plus basic tools including a power drill.

Photo by Chris Horst
[Note while this shows a 1/2” corner brace, I suggest using a 1”]
1. Remove the drawer. You'll have to pull it all the way out and jerk hard to free it.
2. Remove the screw holding the front end of the support/slide assembly.
3. Pull the slide assembly out. You'll find the the lower portion of the rear support bracket attached to it; slide this off.
4. Reaching deep into the cabinet, remove the two screws holding the rest of the rear support bracket to the wall.
5. See the wide slot in the wall-mounted bracket portion that you just removed? Push an 8-32 machine screw through from the back of that slot. Push the 1" x 1" corner brace onto the screw, and add a star washer and 8-32 nut. Tighten securely.
6. Using the other leg of the 1" x 1" corner brace as a guide, mark and drill a hole through the bottom portion of the support bracket.
7. Secure the two pieces together with another 8-32 machine screw, star washer, and nut.
8. Screw the support bracket to the wall, using its original screws. The protruding machine screw head on the rear will try to keep it from seating flush against the wall. Don't worry--just tighten down the screws hard, and it will sink in.
9. Slide the slide assembly onto the rear support bracket, then pull it forward until it latches.
10. Replace the screw at the front of the slide assembly.
11. Replace the drawer.
That probably sounds more complicated than it is, but once you start doing it, you'll see that it's really straightforward. You're just using a small corner brace to mend the broken right-angle bend in the rear support bracket. Once mended, I've never seen a repeat failure.
Replacing the guides:
The two big drawers under the fridge in our FL have been problematic for awhile, popping out of their tracks when extended out unless supported by hand. I gave up on the factory hardware, and ordered new slides rated for 35 lbs., the Centerline 714 24" model.
Comparison between the original Accuride 01048 drawer slide from LD and the Centerline model 714 24": The Centerline is about 1" longer, but fits fine by drilling two new holes in the drawer mount half. It does NOT have the drawer retention feature, so that must be provided separately.
The stock Accuride contains 8 ball bearing sets, and over time, the stress at these few wear points allows the track to pop apart at full extension. Eventually, grooves are worn where the bearings pop out in the cabinet half of the guide, requiring replacement. These guides are available from the Mothership.
I was looking for a better solution in the Centerline guide, which contains 20 sets of ball bearings. This should cause much less stress on the guide and prolong its life indefinitely. Also, the back support for the Centerline is identical dimensionally to the Accuride, but of beefier steel, so I replaced those as well. Once installed, the new tracks had a distinctly more solid feel, and they also extend a bit further out than before.
For a retention feature, I cut triangular pieces of hardwood as ramps, max height about 0.6", and glued them to the underside of the drawer bottom, about 0.95" back from the interior front panel of the drawer near the track. It remains to be seen if they hold up over time, but the feel and function is about the same as with the retention system on the old slides.
Andy Baird, Chris Horst, Steve Chandler
Tuesday, June 26, 2012

Wednesday, June 20, 2012
Restoring Vinyl Wood-grain Molding
Would you like to spruce up the interior trim of your LD?
In a few spots in the interior (the vinyl wood grain molding at the corner of the closet near the entrance door, the molding closest to the latch of the bathroom door and the molding on the forward aisle side of each rear sofa) there are 2' to 3' sections of the wood grain pattern of the molding that has worn off from brushing against it over the years! The light brown base color of the molding now shows through!
The goal was to find a self stick woodgrain vinyl pattern that would match the color and woodgrain that is on the walls and moldings. By covering the worn moldings, the interior would essentially look "New" again!
A persistent search resulted in success at berlinwallpaper.com
The product is actually made in Germany and is great match to the interior! It is made out of a vinyl material that is self stick and easy to apply and trim with a razor. Here is the full description:
DC-Fix Decorative Vinyl
Wild Oak Wood Grain
17 3/4"wide x 6'5" Long
#3460247-DCF $8.99 +$6 S/H
They have a good selection of wood grains that will probably match most LD interiors!
Contributor: Ed (TranQuility)
DC-Fix Decorative Vinyl
Wild Oak Wood Grain
17 3/4"wide x 6'5" Long
#3460247-DCF $8.99 +$6 S/H
They have a good selection of wood grains that will probably match most LD interiors!
Contributor: Ed (TranQuility)
Posted: 20 Jun 2012
Subscribe to:
Comments (Atom)