Showing posts with label End Caps. Show all posts

Wednesday, May 10, 2023

End Caps

These pictures of cracked end caps are examples of the worst case I have seen. They show years of neglect and ineffective amateur repairs.
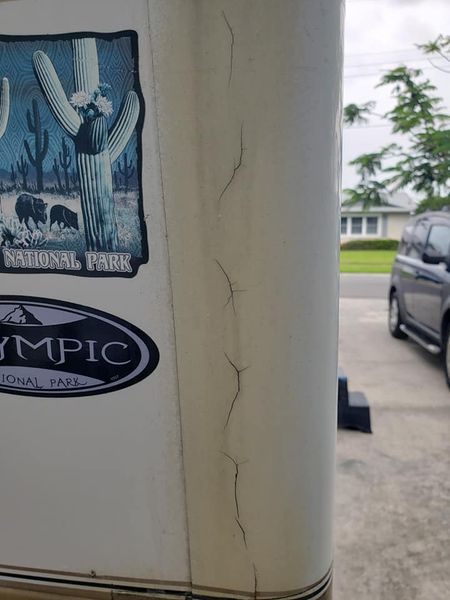

The first picture shows several hair line cracks that could be cured with 3M 5200. I might enlarge the cracks with a Dremel tool before filling them. The takeaway is that they are large enough and numerous enough to allow water into the pine wood that the cap covers. That wood is structural. It holds the window. Also water will find it's way to the floor and you will never know it until it too late.

Curious about this picture is that the cap is a dingy brown. The 5200 is white like the AL next to the cap. Why is the cap brown? Has there already been substantial water damage that has discolored the cap?


Same rig, drivers side. It looks like someone tried to patch the crack with some sort of tape. I would guarantee the wood behind the cap is rotted. Note the WA tag - Hurricane Ridge is a super wet area of the state.

I would say this rig needs the cap replaced, if caps are still available. Once removed rebuilding the wood frame would be possible. Joining new wood to the existing remnants with West System epoxy. Inside surgery might also be required.

If an new cap can not be obtained, I would cut away the damaged area of the cap  leaving the edges for a mold and rebuild with West System epoxy and FG mat. Gflex with a filler added may be the ticket. [West 105 would certainly be the best choice, but would be rather expensive for such a small project]


Puzzling to me is that a crack on the cap seems to extend to the AL skin. It extends all the way to the stripes. Could part of the AL have been patched with FG?

This is a rig to walk away from.

Friday, January 13, 2023

Repairing End Caps

Now that the mothership has closed, you can not remove/replace end caps. (They will be destroyed during removal) So resolving leaks will require a different tack.

After many months of worry and reading up on how-tos, I finally decided to take on sealing the end caps yesterday. I have done numerous caulking jobs in the past, so I’m not sure why I was so nervous about this project, other than the fear the caps could crack or break.

So I printed out the LD Companion steps, read and and re-read them, got all my supplies together and set off from home. The rig is parked remotely, so I had to make sure I had everything with me before I left. I didn’t do too badly in this regard, I only bought a caulking gun.

To the supplies list on the Companion, I would only add or confirm what helped me:

•   Air compressor (to blow out any debris)
•   10oz tube of 5200 Fast cure (much more than enough, but I didn’t know at the time how much I’d need)
•   Painters tool & a plastic putty knife
•   A caulking gun (depending)
•   Stainless steel screws & drill
•   Brake cleaning fluid – maybe overkill, since I also used a compressor, but for $3 more, why not?

I ended up not using the DAP 3.0 crystal clear sealant on the colored area - I wasn’t troubled by the thin line of white that the 5200 left in the blue sections. I brought clamps, thinking I could use them at least up near the cab, but there’s no way to do that, so I went with stainless steel screws of various lengths, ¾” to 1.5”).

The prep work was pretty easy, I started on the driver’s side end cap next to the cab because there was a good amount of separation which gave me space to work and see what was underneath. I didn’t get it all the sealant but I got enough so the new stuff would adhere to the surfaces. I used an acetone-soaked cloth wrapped around a putty knife to clean out the area as good as possible and finished it off with the brake cleaning fluid that’s mentioned in the Companion. [Ed. The best clean up is MEK. MEK is now available for retail sales in many states. I notice that ACE hardware is now selling an MEK substitute. Never heard of using brake fluid.]

After I cleaned the first area, I went to the rear end caps which is what I had been afraid of for so long. I did the same cleaning steps, using a razor knife, putty knife, acetone soaked putty knife and scraped as much as I could. I didn’t think to have a rag handy to catch drips when spraying the brake cleaner so it ran down the side of the end cap and appeared to stain it. I wiped it off as quickly as possible with acetone and a rag, but probably not fast enough. Other than that, prep work went well.

Now I was nearly ready to start with the 5200 sealant. I had gone through the steps in my head because I wanted to work as efficiently as possible. Plus it was hot and the layers of nitrile gloves were dripping sweat pretty early in the process. It was about this time I realized I had left the caulking gun at home.

With my new $5 caulking gun, I taped off my work areas (I could have done this before I started but didn’t). On the front end cap I pre-drilled two holes thinking they would be enough to secure the end cap. I underestimated by 4 screws. I wish I had thought through their placement sooner, but I was already in progress with an open tube of sealant.

I moved to the back and began work on the area that gave me the greatest amount of fear. It actually didn’t go too badly at all. I had a spot up at the top of the coach that had considerable separation and I was able to fill it and pop in a screw. I’ll cover it with Eternabond next. I added screws as shown in the photos – I hope the LD community isn’t too horrified at how I defaced her with the screws. In my defense, there were already screws in other parts of the end caps, so I wasn’t the first one to do this. Not sure if this was done by the factory when it was built or sometime thereafter. Instead of removing the screws, I think I will be painting over them once I can get some matching paint. Here’s hoping they don’t crack the end caps, which may be the reason that I should remove them and fill in the holes. Any thoughts from the community on this are appreciated. I sank the screws in (not too snugly) only after I had filled the gaps with sealant to ensure that they would have sealant on the threads.

I went back today to take a look at it and I don’t feel too terribly about it. I’ve included some before and after photos of how it looks.

Long story short, it’s not the most professional-looking job, but it should stop water intrusion, which is the goal. I think I’m satisfied enough with the result. I probably wouldn’t do this on a 90 degree day either, but I was also wanting to get the project checked off the list.

I used a good deal of 5200 on the front end cap, if I hadn’t needed to do this, I would have gotten the small tube. I think I only used 2/3 of the 10 oz tube, which cost $25. All in all, a pretty low-cost, not-overly complex project.


Thursday, April 22, 2021

Water Damage From A Cracked End Cap


I have heard about water damage since I bought our rig in 2007. I was proactive in sealing the roof after 6 years. I thought checking the seams every year would keep me safe. Wrong.

OK, I have an alibi. A health issue prevented me from inspecting the rig from July 2019 to September 2020. I knew in July 2019 that a few droplets of water had entered from up high, had run down the passenger side wall, and left a trace mark on the plywood of the couch. So I knew something was going on, but it was not a big issue and I could not do anything about it at the time.

Finally, in October 2020, I sealed the tiny cracks in the end caps. Though I could not believe the tiny hairline cracks were a problem. I felt I had solved the problem and covered the rig.

The following January - We had long planned to remove/replace the wallpaper below the rear window that had wrinkled. I thought wrinkling was from repeated condensation on the metal window frame. I had wiped off condensation many mornings over the years. Anyway, time to address the issue.

When I started removing the wallpaper I found the 1/8 ply the paper is glued to was soft and rotten. It had also gotten to the framing in the corner. Mostly just discolored. No structural damage.

The FG insulation was soaking wet almost a foot up. Was it wicked up? Or was it water coming down?

When I removed the side valance to get access to the corner, I noticed that water had streaked down to the place that I first noticed a little discoloration on the plywood couch frame. I had checked the seams but will be checking again. 

It has been 8 weeks since I patched the end caps and no moisture is evident.
I have replaced the luan and will attach it with screws to make an inspection port so I can easily check on it.

The luan will be covered with some plastic tiles, shown in the last photo that kinda blend with the wallpaper. Bless LD for not using a pattern. That would be a much bigger job.

Moral, Keep on checking your rig on a regular basis by pressing on the plywood in then walls around windows.


What I found


Covered with WEST System epoxy


Luan underlay


To be covered with these stick on tiles


Products used


Sealed the wood with epoxy

Used to seal the seams that are painted white. Close match to Ford White. Thin bead. Clean up with MEK if you can find it. [5/23 ACE Hardware is now selling a MEK Substitute]  Paint thinner works, but not as well. Wear old clothes

5200 is also available in black to seal window frames


Clear tape used to seal cracks in endcaps where they are painted a color other than white


Tuesday, January 18, 2011

End Caps


There are two articles on end cap repair. The first discusses both early and later model end caps. The second concerns later model Lazy Days.

The Problem

Most LD owners have seen at least some separation of the end caps, the vertical corner pieces. This obviously can be a major problem in that it allows water infiltration that can cause significant damage. Over the years, the Mothership has made some changes in how the corner pieces are installed. Former LD owner Don McGlothen has thoroughly researched this problem and recently posted an updated report:

The following reflects my opinion and experience and is not posted to be anything but just that.
I've seen many ABS End Cap Molding adhesion failures at gatherings of Lazy Dazes, mostly on coaches over two years old. I've seen pre-2004 Mothership end cap repairs that had not failed and many that had. I've been told of a recent Mothership repair of the rear End Cap configurations that has the `joggled' overlap joint between the rear upper and rear lower End Cap sections; that repair also did not last. The overlap joint had been filled with sealant, which I've found leads to quick failure of upper End Cap adhesion. The reason appears to be that as the upper and lower End Cap sections expand thermally, the upper cap section 'rides up' over the overlap joint and over the sealant in that joint. This essentially lifts the upper End Cap away from the aluminum body side panels and the sealant that holds the end cap tight against the siding there fails.

Those of you with End Cap problems know that the ABS End Caps have come loose in other locations, particularly the lower parts of the both front and rear vertical End Caps. If let go long enough without repair, ABS End Caps will break. They are not strong enough to handle constant flutter in the breeze at 60 mph, or a snag on your St. Bernard's collar. The longer you wait to repair them, the more expensive your repair may be. The end cap sealant fails because of differential thermal expansion of the end cap material and the body siding, and, body flexing. 

Not all Lazy Daze End Caps are merely cosmetic, in some years production, they may protect unsealed wood structure. For some Lazy Daze built before 1999, the sealant may not have been applied to completely cover all the wood structure under the End Caps. If you have partially disbonded End Caps trying to protect unsealed wood, you may discover a wet wood problem fairly late in its development.
(Of course, if you never go where it rains, never wash your coach and your large dog is well trained, no problem.) I understand that later Lazy Daze (around 1999 to 2000 and on) have all their wood structure under the End Caps covered with a sealant. That should preclude developing a wet wood problem because of end cap disbonding. If you are in doubt about your earlier production Lazy Daze, ask the Mothership.

On our 2001 26.5' Lazy Daze MB the rear end cap sealant was still in good condition after over two years of service with `Big Stretch" sealant applied where the factory installed adhesives had failed - EXCEPT – In my second and successful repair, I removed all the sealant I could from the overlap joint of the rear end caps. My experience is that correctly applied Big Stretch sealant to attach failed areas of VHB tape attachment will provide at least several years of service without failure. On the other hand, my experience with Parlastic and other PR255 recommended sealants failed after a short time. They just don't appear to stretch enough before they stop holding hands.

There is really good news for the future. The Mothership this year has replaced activated VHB tape bonding of End Caps in their production with a new adhesive. This new adhesive shows real promise for very long life without disbonding but it takes special equipment to install it and it is not something you can do.

I believe the Mothership could use this new production adhesive to repair in-service coaches that have end cap disbonding problems. By carefully applying heat and skillfully wielding a putty knife, any partially disbonded VHB tape adhesive and the rest of its End Cap should be removable. After cleaning off the old adhesive, ABS end caps in good enough condition - or new ones if necessary - could be re-installed on your Lazy Daze using that new production adhesive. Since 2006, the Mothership has done these repairs for a price - ask them. New end caps are often part of this repair. It looks to me that this would result in an End Cap installation equivalent to current new production.

Summary:

I achieved a long-lasting repair of our 2001 partially disbonded ABS End Caps using edge sealing with locally available materials. It really was quite easy to do and I still don't understand why others with the condition don't just fix theirs themselves. End Cap adhesion stopped being a problem for me and it can for you as well.

Not fixing or having someone fix partially disbonded End Cap(s) will result in further disbonding and perhaps more serious trouble.

Repair
I used DAP 3.0 crystal clear sealant to seal the seams and the end caps.
It works well in applications where a white sealant would cosmetically be inappropriate. My preferred sealant is 3M's 5200 marine polyurethane but it is not available clear. Since the seams and end caps are painted in both white and the color of the motorhome, a clear sealant is required to look correct.

To get good penetration in the seams, I applied masking tape to both sides of the seams, leaving a 1/4" gap to expose the seam. A bead of the Dap 3.0 was applied to each seam and then forced into the seam using a gloved finger. The masking tape contains the excess sealant, leaving a clean surface when the tape is removed.

The end caps required a thicker bead that was also forced deep into the gap. Some sections of the rear end caps needed two applications to totally fill the wide gaps.

Proper preparation is needed to ensure that the sealant does its job.
The entire rig was wash and dried. Compressed air was used to blow out the seams and then left to completely dry. The end cap gaps were cleaned and scraped to removed any loose paint and old sealant and to provide a place for the sealant to be placed.

You could re-glue the cap and use screws to pull the cap back into place until the adhesive cures and then remove the screws. That might be a better solution since the caps often crack around the screws.
There is a lot of stress applied to the caps, both from the twisting and flexing that the body goes through while on the road, not to mention the thermal expansion and contraction forces. LD builds a strong body that stays that way unless the wood frame gets and stays wet, allowing rot to weaken the structure. Our responsibility is to make sure water does not get in.


Contributors: Don McGlothle, Larry Wade, WxToad

Revised: 12 Oct 13

~~~~~~~~~~~~~~~~~~~~~~~~~~~~~~~~~~~~~~~~

A Rehash of Sealing End Caps


Supplies:

Enough gloves

Blue tape

Acetone/MEK/lacquer thinner 

3M 5200FC

DAP 3.0 crystal clear sealant 

Razor knife

Toothbrush

Paper towels/Soft cloths (like tshirts) to remove 5200FC and DAP


Most of this content is by Larry Wade taken from several of his posts and emails. I have merged his words and mixed in my experience. While I wound up going in different directions from Larry, I would have never gotten anywhere without his guidance.


I am going to use the word solvent to mean acetone, lacquer thinner or MEK. I have a preference for MEK as it is designed to dissolve epoxy and does not affect the paint if wiped off. Acetone is reported to be able to remove the black paint from the window frames. MEK has much less smell than other solvents.


Prep

If you need to get above your head, put sawhorses or platforms in place before starting.


When using 3M 5200FC, wear old clothes and disposable gloves. The stuff sticks to everything and is very difficult to remove when dry, one of the reasons it works so well.


5200FC must be used in 24 hours of opening it.


Start the job wearing three pairs of disposable gloves. That way when a glove becomes contaminated, you can just peel it off and keep working.


Clean the gap to be filled. Cut away with a razor knife as much old sealant as possible. I found after scraping and cleaning with MEK that the solvent would dissolve some of the old sealant and allow more to be removed. I used a toothbrush soaked with a drop of MEK.

When done scraping, use solvent to clean the gap. Spray brake cleaner, a fast evaporating solvent, to blow out debris.


Now use blue masking tape on any place where you do not want the 5200FC.


Application


Larry Wade suggests applying an oversize bead of sealant along the gap to be filled the entire way and then use a gloved, wet finger to push the sealant firmly into the gap and then remove the excess and smooth the sealant. I found the 5200 to be too tacky for this to work for me. I did find that smoothing with a cut-up piece of t-shirt soaked with MEK smooths and cleans perfectly. I did the smoothing about 3 minutes after application. The difference is probably in technique, I have not seen how Larry does it.


As soon as you are done smoothing, remove the tape before it has a chance to start skimming over. When removing the blue tape, pull it gently toward the sealed seam, which minimizes the chances of "stringing" sealant onto the unsealed surface. [Thanks Joan] If there are spots where the sealant has spread, let it cure for about 45 minutes and then use a solvent to gently remove it. I found that MEK can be used right away to clean up


Joan uses craft sticks (popsicle sticks) rather than fingers for "pointing" the 5200 into the seam so she only needs a dozen or so glove changes rather than two dozen! I could not make this work for me. I cut the smallest opening in the 5200 applicator to make a thin bead this worked best for me. I just moved the applicator back and forth until the seam was filled.


I had been quite apprehensive about applying the 5200. It turned out to be easy to work with. I even filled some hairline cracks freehand - no tape. After a minute or so, I was able to wipe with MEK and the crack has disappeared. 


DAP 3.0 crystal clear sealant can be used for sections of the caps that are not white. [5200 only comes in white and black]

3M VViVid tape can be used to cover over the DAP. Unlike the 5200, I had problems with the DAP. It did not flow into narrow cracks, but rather stayed on top.


Have a cold one. Let it cure overnight.


OTHER LEAKS


The three-piece rear windows can leak if the rubber around the glass shrinks. The fix is the application of a thin clear silicone around the perimeter of each piece of glass. Larry Wade suggests Permatex 81730 Flowable Silicone Windshield And Glass Sealer, 1.5 Oz  This is good stuff and easy to work with. My gasket was compressed and I was able to fill the four-inch depression without removing the window.


You can see a slight compression of the gasket. Enough to allow a few drops to enter every time there was significant rain.


The external seal around the perimeter of the window frames shrinks with age and can cause the seal to pull back and leak. Resealing the perimeter of the frame with Black 5200 FC is Larry’s fix.


I had a leak from the ceiling over the entry door. Larry recalled that I had replaced the AC two years ago. He noted that a major cause of roof leaks is the A/ C as the gaskets can compress and need retightening. I pulled the interior cover and tightened the bolts four turns. I put a hose on the AC and after 30 minutes no water was noted. Well done Mr. Wade.


Contributors: Larry Wade, Don Malpas

Revised: 19 Oct 20


Return to FAQ Index