Friday, May 17, 2024

Sunday, June 4, 2023

Replacing the Generator Fuel Pump

The long saga with my generator refusing to run longer than a few minutes is finally resolved. 

How the generator got in this condition is worth reviewing.

Since we have owned our LD, we have been on the road over half of each year so the generator was used as we eschew campgrounds with hookups. However, camping wo popcorn is way too primitive. [It’s not the hookups, we mind, it’s that the people that frequent these CG’s are just not “our people”. We have little in common with them. Concrete Campers and Boondockers are two different species]

At home, I run the generator with a load for 45-60 minutes a month.
Using the generator, keeps the gasoline in the carburetor from turning to varnish and gumming it up.
A health issue prevented me from doing the monthly exercise for well over six months.
In hindsight, had I thought about it I could have drained the carburetor. But that bypasses the other reason for exercising the generator.

Not using the generator is true for most LD’s. I suspect few do a monthly exercise. (*) So there should be a lot of gummed up carbs out there. Mine sure was after months without use.


Symtoms:
It would run for 3-4 minutes, constantly surging. I could see the butterfly valves rapidly swinging back and forth. It would throw a 3-3 code which is not a documented code.

Trying to figure out the problem, I entertained all sorts of suggested remedies. Few had any bearing on the issue. One was too drain some oil out of the crankcase. Really! I noted the fuel pump supplied seemingly copious quantities of gas. After cleaning the carb bowl of varnish (https://www.youtube.com/watch?v=6053Qti0OLU&t=1102s) it ran a few minutes longer. I finally bit the bullet and ordered a Onan (not a knock off) fuel filter and pump. ($200+) I then embarked on the extremely PIA procedure to replace them. (https://www.youtube.com/watch?v=jlrHl0OWSZU)

Worth doing:
1)  Put colored tape on the wires you disconnect so you know where they go.
2) Take pictures before you take it apart.
3) Try see where the wires will have to be tucked back in as you carefully and slowly remove the control board. I failed this.

When I got it put back together, I primed it and it fired up and ran perfectly. Bob’s your uncle.

Be sure and tighten the fuel supply line from the pump before replacing the control board. I failed this and got to remove the board to access the fuel line. Also check for any other fuel leaks.


* If you see an aged RV advertised with low hours on the generator, figure it does not work. A 10 year old LD, should show 120 hours minimum on the meter.

Monday, May 22, 2023

Sewer Hose Storage

Dealing with sewer hose can be intimidating for a new RV'er. Lazy Daze comes with a tube for storing the sewer hose and the sewer hose supplied has no connector on the busy end. It felt gross to dip my hose into the dump station sewer opening, so I found an alternative solution. I bought Prest-O-Fit 1-0203 Blueline Ultimate Sewer Kit on Amazon. For  about $50 you get two 10 foot hoses and and an elbow connector that fits various dump station sewer openings, including the threaded ones. The Prest-O-Fit connector is narrow - same diameter as the hose itself, so it slides into the storage tube easily. On the other side (the one that hooks up to the RV), I have installed Duraflex 24649 45° Angle Hose Adapter using 3" adjustable duct clamps. The 45° hose adapter is small enough to allow the store tube cover to close neatly. I carry one 10 foot hose in the tube, and the second one as a spare in the front compartment on the left side along with the elbow connector stored in a ziplock. I rinse elbow connector after usage and overall I am pretty happy with the setup.


Wednesday, May 10, 2023

End Caps

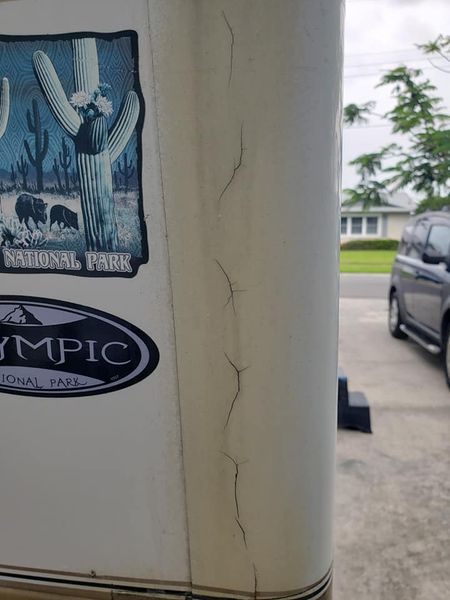
These pictures of cracked end caps are examples of the worst case I have seen. They show years of neglect and ineffective amateur repairs.


The first picture shows several hair line cracks that could be cured with 3M 5200. I might enlarge the cracks with a Dremel tool before filling them. The takeaway is that they are large enough and numerous enough to allow water into the pine wood that the cap covers. That wood is structural. It holds the window. Also water will find it's way to the floor and you will never know it until it too late.

Curious about this picture is that the cap is a dingy brown. The 5200 is white like the AL next to the cap. Why is the cap brown? Has there already been substantial water damage that has discolored the cap?


Same rig, drivers side. It looks like someone tried to patch the crack with some sort of tape. I would guarantee the wood behind the cap is rotted. Note the WA tag - Hurricane Ridge is a super wet area of the state.

I would say this rig needs the cap replaced, if caps are still available. Once removed rebuilding the wood frame would be possible. Joining new wood to the existing remnants with West System epoxy. Inside surgery might also be required.

If an new cap can not be obtained, I would cut away the damaged area of the cap  leaving the edges for a mold and rebuild with West System epoxy and FG mat. Gflex with a filler added may be the ticket. [West 105 would certainly be the best choice, but would be rather expensive for such a small project]


Puzzling to me is that a crack on the cap seems to extend to the AL skin. It extends all the way to the stripes. Could part of the AL have been patched with FG?

This is a rig to walk away from.

Oxidation /Electrolysis on Aluminum Sides


The bumps that are on the aluminum sides of some Lazy Dazes, that people call bumps, rust, or corrosion is oxidation (also often referred to as electrolysis).

It is caused when water/moisture gets between the aluminum and the coating/paint on the outside of the aluminum.  

This happens because the paint/coating becomes permeable over time as the aluminum flexes and is stressed.  It has been seen on LDs never exposed to sea air or chemicals used on snowy roads, it has been seen on LDs just a few years old,  but most often it is on older LDs.

Having one or even many of these does not mean that water got into your LD wall - that problem comes from other causes.

Once electrolysis starts, it will continue even if there is no more moisture/water (eg in a desert inside a garage), and the bumps just get worse.

To fix the bumps the basic steps (details below) are to sand the the area down to bare metal.  The area needs to be cleaned as a prep to the next step.  Then any damage to the aluminum needs to be fixed.  Then just primer and paint.  

Airlines use Scotch-Brite Surface Conditioning Discs (a drill attachment) to sand the affected area.  Make sure you get all the affected area (go a little bigger than the bumps until you see good paint-aluminum adhesion).

We found conditioning discs at Home Depot.

The material inside the bump typically crumbles - like chalk would.

Once you have the area sanded you will see different situations.

For a newer bump you will see the aluminum looks fully intact (no holes or indentation).

You may see no holes but an indentation, this needs to be patched back up to level (details below).

If the bumps have been there a while (larger) you will likely see a hole once you sand it down.  The hole can be the size of a straight pin body or larger.  

The oxidation leaves behind a fine powder.  If you have a hole, that powder will be in the hole and as part of the cleaning you need to use compressed air (canned air works fine) to blow out any dust you can so the repair material will stick.  Throughly blow it out - past where you think you have it all out (speaking from experience here).

You can check if the hole let water into the wall - depends a lot on your climate (rain, humidity) and size of the hole that penetrated fully through the aluminum.

If the hole is very tiny, it is  unlikely water got into the wall but the only way to check is from the inside.

If the hole is larger (I have not seen any larger than 1/16” but of course they could get larger), you can check by poking inside the hole to check for wood rot.  I highly suggest knowing how it feels to poke (with metal) new pine wood (soft wood and softer than the older wood in your LD) so you know if the wood inside the siding hole is rotted or not.  But personally if I felt wood rot I would address that from inside the LD unless I was taking that siding completely off for other reasons.

To repair the damaged aluminum - an indentation or a hole - even a tiny one, 

Use JB Weld brand epoxy - this is what commercial aircraft uses.  There is a lot of JBWeld, make sure you choose one that clearly say it works on aluminum (stated on back of package typically).  

Prep as the JB Weld says to.  The JB Weld we used hardened quickly but it also sanded level very easily.  It was also easy to scrap level with a plastic putty knife which almost completely eliminated any need to sand.

When that cures, primer and paint - most LD owners use automotive primer paint.

Do not leave the aluminum bare - this will just create more oxidation.


Friday, January 13, 2023

Repairing End Caps

Now that the mothership has closed, you can not remove/replace end caps. (They will be destroyed during removal) So resolving leaks will require a different tack.

After many months of worry and reading up on how-tos, I finally decided to take on sealing the end caps yesterday. I have done numerous caulking jobs in the past, so I’m not sure why I was so nervous about this project, other than the fear the caps could crack or break.

So I printed out the LD Companion steps, read and and re-read them, got all my supplies together and set off from home. The rig is parked remotely, so I had to make sure I had everything with me before I left. I didn’t do too badly in this regard, I only bought a caulking gun.

To the supplies list on the Companion, I would only add or confirm what helped me:

•   Air compressor (to blow out any debris)
•   10oz tube of 5200 Fast cure (much more than enough, but I didn’t know at the time how much I’d need)
•   Painters tool & a plastic putty knife
•   A caulking gun (depending)
•   Stainless steel screws & drill
•   Brake cleaning fluid – maybe overkill, since I also used a compressor, but for $3 more, why not?

I ended up not using the DAP 3.0 crystal clear sealant on the colored area - I wasn’t troubled by the thin line of white that the 5200 left in the blue sections. I brought clamps, thinking I could use them at least up near the cab, but there’s no way to do that, so I went with stainless steel screws of various lengths, ¾” to 1.5”).

The prep work was pretty easy, I started on the driver’s side end cap next to the cab because there was a good amount of separation which gave me space to work and see what was underneath. I didn’t get it all the sealant but I got enough so the new stuff would adhere to the surfaces. I used an acetone-soaked cloth wrapped around a putty knife to clean out the area as good as possible and finished it off with the brake cleaning fluid that’s mentioned in the Companion. [Ed. The best clean up is MEK. MEK is now available for retail sales in many states. I notice that ACE hardware is now selling an MEK substitute. Never heard of using brake fluid.]

After I cleaned the first area, I went to the rear end caps which is what I had been afraid of for so long. I did the same cleaning steps, using a razor knife, putty knife, acetone soaked putty knife and scraped as much as I could. I didn’t think to have a rag handy to catch drips when spraying the brake cleaner so it ran down the side of the end cap and appeared to stain it. I wiped it off as quickly as possible with acetone and a rag, but probably not fast enough. Other than that, prep work went well.

Now I was nearly ready to start with the 5200 sealant. I had gone through the steps in my head because I wanted to work as efficiently as possible. Plus it was hot and the layers of nitrile gloves were dripping sweat pretty early in the process. It was about this time I realized I had left the caulking gun at home.

With my new $5 caulking gun, I taped off my work areas (I could have done this before I started but didn’t). On the front end cap I pre-drilled two holes thinking they would be enough to secure the end cap. I underestimated by 4 screws. I wish I had thought through their placement sooner, but I was already in progress with an open tube of sealant.

I moved to the back and began work on the area that gave me the greatest amount of fear. It actually didn’t go too badly at all. I had a spot up at the top of the coach that had considerable separation and I was able to fill it and pop in a screw. I’ll cover it with Eternabond next. I added screws as shown in the photos – I hope the LD community isn’t too horrified at how I defaced her with the screws. In my defense, there were already screws in other parts of the end caps, so I wasn’t the first one to do this. Not sure if this was done by the factory when it was built or sometime thereafter. Instead of removing the screws, I think I will be painting over them once I can get some matching paint. Here’s hoping they don’t crack the end caps, which may be the reason that I should remove them and fill in the holes. Any thoughts from the community on this are appreciated. I sank the screws in (not too snugly) only after I had filled the gaps with sealant to ensure that they would have sealant on the threads.

I went back today to take a look at it and I don’t feel too terribly about it. I’ve included some before and after photos of how it looks.

Long story short, it’s not the most professional-looking job, but it should stop water intrusion, which is the goal. I think I’m satisfied enough with the result. I probably wouldn’t do this on a 90 degree day either, but I was also wanting to get the project checked off the list.

I used a good deal of 5200 on the front end cap, if I hadn’t needed to do this, I would have gotten the small tube. I think I only used 2/3 of the 10 oz tube, which cost $25. All in all, a pretty low-cost, not-overly complex project.


Sunday, October 16, 2022

Clearance Lights

There are two styles. Round and rectangular. The latter was used in at least 2007 and forward both front and rear. The author of this article had a round lens on a 2000 model. The round style is a Peterson 102-15 series. The assembly is out of production. The lens is available from Fox Tail Lights. PM 102-15 A or R.


The front 5 clearance lights on my 2000 Rear bath were cracked and falling apart. Over time the housings will eventually crack and the screws used to install the lights will corrode. On my lights, the screws have so corroded a screwdriver would not be used to remove them, and some of the heads broke clean off.

Water Intrusion is a certain issue when the clearance lights get this bad, I can’t say after removing and replacing the lights that zero leaking had occurred, but I have zero signs of water damage on the interior paneling and it does look like lazy daze sealed some of the wires/screws from the inside and outside when the front cap was assembled.

The procedure is as follows:

1. Remove screws holding old clearance light in place, if the head cannot be accessed with a screwdriver I used “engineer screws extractor pliers”…they can be found on Amazon and are an absolute godsend with working with rusty screw heads.

2. Slowly break apart the old light housing around the sealant wiring, there is a significant amount of sealant so just cracking the housing in half (after snipping the wires) is necessary.

3. Pry as much old sealant from the wires as possible, on 4/5 of my lights it appears the wires have sealant applied from the opposite side of the end cap, so while there is zero chance of pulling some slack, there also was no chance of the wires going back and getting lost within the cap.

4. Take the new light fixture and drill/ream whatever sized hole was necessary to fit the wiring through, this varies as the lights have 2 butt connectors and a few strands connected, the does not matter how much of a hole you drill, as long as it is all sufficiently bedded in sealant.

5. Apply sealant behind the new fixture and around the wiring, and press the fixture into place. I screwed the fixture down with #8 screws at first but they didn’t hold as tight as I preferred, I swapped to #10 and actually used a #12 on one of the mounting holes that were stripped from me removing the old rusty screw.

6. If you are using incandescent bulbs polarity does not matter, so I attached 1 wire to the light housing/mounting screw with a ring connector, and attached the black provided wire with a waterproof twist-on butt connector. 

Using a twist-on butt connector is likely the least reliable way to make this connection, but I choose waterproof (greased) versions. This allows me to remove the connector in the future if need be, since there is virtually zero extra wiring to work with, I avoided a permanent crimp connection. Likewise, because everything is so thoroughly packed in the fixture, very little movement will occur when going down the road.  These wiring decisions could allow me to remove and replace the fixture again in the future without needing to cut the wiring.

7. Once all connections were made, inspected to ensure sufficient sealant is applied, then follow up with a layer of dielectric grease over the stainless screw heads, into any open wiring splices, and into the bulb socket. This step could double the life of these connections in regard to corrosion resistance.

The only concern I have with this whole setup is the lack of adequate water draining, the fixtures have a drain hole but it will not function once they are installed, and adding a drain hold in the ideal location would likely result in weakening of the overall fixture. I will monitor how much water enters and stays within the fixtures over the long term. Water allowed to stay in the fixture will freeze in the winter and cause cracking.

I have attached photos of the fixtures I purchased. They were surprisingly difficult to source in the required diameter, but these are the exact diameter as the Peterson manufacturing 100 series and the mounting screws fit up perfectly, the only modification required was to drill holes large enough and in the correct locations to bring the wiring through.

I would rate the difficulty of this repair pretty low on the spectrum, however, it is relatively tedious.


I would use LED bulbs. Color emitters to match the shade of the lens.  These are available from Super Bright LED.

Red:  194 LED Bulb - 5 SMD LED Tower - Miniature Wedge Base | Super Bright LEDs   

Amber:  194 LED Landscape Light Bulb - 5 SMD LED Tower - Miniature Wedge Retrofit -


They use less power, the bulb doesn't turn black as the tungsten filament coats the inside of the glass, and the color stays true if the lenses fade.