Showing posts with label Drawers. Show all posts

Thursday, July 19, 2012

Drawers Will Not Lock


A common problem with the drawers in our LD's is that over time they get to the point where they will not stay closed when you're underway.

There seem to be two problems, either of which results in this problem.

In the first case, there is a problem with the tapered stop on the underside of the drawer. If the drawer goes as far back as you can push it, but is still able to rock from side to side, then that conical latch is not engaging.


Shorten it just a little as described, and the drawer should latch. Use a Dremel or similar tool with a cutoff wheel to remove a 2mm sliver from the large end of the tapered cone. Doing this lets it go past and then drop down over the retainer tab on the cabinet-mounted slide.


Another possible problem is that  over time the drawer slides can get bent and prevent the drawer catch from working properly. Heavily loaded drawers are more prone to this. So when drawers start popping open too easily, pull the drawer out and check the slide parts for straightness.
                                                                        
 The inner slide part that mounts on the bottom of the drawer is not as rigid as the outer slide part that mounts in the cabinet, and thus tends to be the part that gets bent. In the picture at left, the inner track should be nearly flush with the outer track, but now has a fairly pronounced bow.


In the past, straightening the slide would allow the drawer to lock again. During our last major trip, one of the kitchen drawers completely refused to lock anymore.

                                                                       
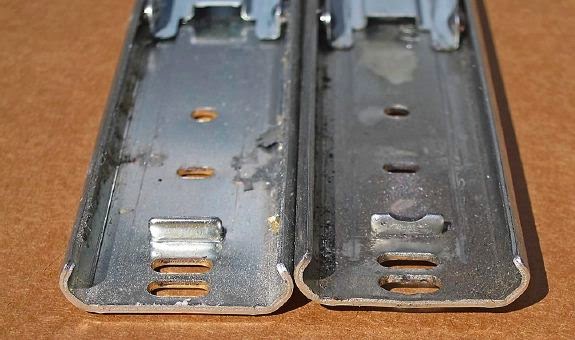
On inspection, I could see that the metal tab in the outer slide part that the inner slide catches on to lock had a groove worn in it from several years of use (new slide on left, old on right).   


The combination of the groove and the bow of a bent slide, meant that the lock wasn't close to catching.


We recently had a trip that allowed us to swing by the factory, where I picked up new slides for our kitchen drawers. Since I've gotten home and replaced those slides, I've looked up the parts to see that they are available MUCH CHEAPER online. So if anyone has reason to replace slides themselves, they are an Accuride 1029 Center Mount Slide. Just measure your old slide and order the correct length.

 Of course, it would be nice to prevent the slides from bending in the first place. For upper drawers, that can be accomplished by screwing a length of  1"x2" fir to the bottom side of the track. For the bottom drawer, you can insert a small brace between the floor and the bottom of the slide. Here is how Larry did it:

In the left picture you can see the small brace under the lower slide.

Contributors: Andy Baird, Art, Larry Wade

Revised: 23 Aug 2014

Tuesday, July 17, 2012

Broken Drawer Guide

The drawer rails/guides that LD uses often lead to some issues with drawers not opening or not staying shut. Heavy contents can cause failure of the brackets. Solutions: beef up the existing brackets or replace the rails/guides completely.

Strengthening the existing guides:

The drawer guides are apparently meant for socks and underwear, so if you load them with wrenches and hammers the way I do, the brackets are under a lot more stress than they were designed for.
In every case I've seen, the break was at the right-angle bend in the rear support bracket. The forming process must embrittle that area. Fortunately, the fix is fairly easy. You need a 1" x 1" corner brace, two #8-32 x 1/2" machine screws, and two each #8 star washers and #8-32 hex nuts, plus basic tools including a power drill.
Drawer-bracket-repair
Photo by  Chris Horst
[Note while this shows a 1/2” corner brace, I suggest using a 1”]

1. Remove the drawer. You'll have to pull it all the way out and jerk hard to free it.
2. Remove the screw holding the front end of the support/slide assembly.
3. Pull the slide assembly out. You'll find the the lower portion of the rear support bracket attached to it; slide this off.
4. Reaching deep into the cabinet, remove the two screws holding the rest of the rear support bracket to the wall.
5. See the wide slot in the wall-mounted bracket portion that you just removed? Push an 8-32 machine screw through from the back of that slot. Push the 1" x 1" corner brace onto the screw, and add a star washer and 8-32 nut. Tighten securely.
6. Using the other leg of the 1" x 1" corner brace as a guide, mark and drill a hole through the bottom portion of the support bracket.
7. Secure the two pieces together with another 8-32 machine screw, star washer, and nut.
8. Screw the support bracket to the wall, using its original screws. The protruding machine screw head on the rear will try to keep it from seating flush against the wall. Don't worry--just tighten down the screws hard, and it will sink in.
9. Slide the slide assembly onto the rear support bracket, then pull it forward until it latches.
10. Replace the screw at the front of the slide assembly.
11. Replace the drawer.
That probably sounds more complicated than it is, but once you start doing it, you'll see that it's really straightforward. You're just using a small corner brace to mend the broken right-angle bend in the rear support bracket. Once mended, I've never seen a repeat failure.

Replacing the guides:

The two big drawers under the fridge in our FL have been problematic for awhile, popping out of their tracks when extended out unless supported by hand. I gave up on the factory hardware, and ordered new slides rated for 35 lbs., the Centerline 714 24" model.

Comparison between the original Accuride 01048 drawer slide from LD and the Centerline model 714 24":  The Centerline is about 1" longer, but fits fine by drilling two new holes in the drawer mount half. It does NOT have the drawer retention feature, so that must be provided separately.
 
The stock Accuride contains 8 ball bearing sets, and over time, the stress at these few wear points allows the track to pop apart at full extension. Eventually, grooves are worn where the bearings pop out in the cabinet half of the guide, requiring replacement. These guides are available from the Mothership. 

I was looking for a better solution in the Centerline guide, which contains 20 sets of ball bearings. This should cause much less stress on the guide and prolong its life indefinitely. Also, the back support for the Centerline is identical dimensionally to the Accuride, but of beefier steel, so I replaced those as well. Once installed, the new tracks had a distinctly more solid feel, and they also extend a bit further out than before. 

For a retention feature, I cut triangular pieces of hardwood as ramps, max height about 0.6", and glued them to the underside of the drawer bottom, about 0.95" back from the interior front panel of the drawer near the track. It remains to be seen if they hold up over time, but the feel and function is about the same as with the retention system on the old slides.  

Andy Baird, Chris Horst, Steve Chandler


Sunday, January 16, 2011

Drawers

The drawers in a Lazy Daze can present a challenge to new owners - how the heck does one remove and/or replace a drawer? The answer - brute force (sorta):

Pull the drawer out as far as you can. Push it in three or four inches. Energetically pull it out again, allowing it to bounce off of the stop. You will note that it came out a bit further than it did before. Repeat until it comes out in your hands.

To reinsert the drawer, first make sure the ball bearing glider in the guide as you look into the drawer's hole is all the way to the front. Then carefully insert the runner on the bottom of the drawer into it and, while hoping for the best, push the drawer in. If you have managed to get the runner inserted properly in the ball bearing glider the drawer will go in but will want to stop before it is all the way in. Pull it out a bit and then push it in hard, reversing the process of how you took it out. (If you don't feel some resistance, the runner missed the glide. Try again.)

What you are doing is sliding the guide on the bottom of the drawer in the ball bearing glider in order to position it so it will act as a limit, preventing pulling the drawer out too far. This has to be done with a LITTLE force.

Problem: Drawer will not stay shut when traveling.

Solution:
1. According to the LD manual, you must push the drawer inward and down with authority to lock it in a closed position. If it still will not stay closed....
2. Remove the drawer and check for bent drawer guide track. If not perfectly straight and flat, gently bend it back.
3. Remove the drawer adjust the drawer locking tab on the track that contains the ball bearing glide. The tab is about 1/8" tall and 3/4" back from the outside end on the track. Place a short 2:"-3" long flat blade screwdriver into the slot directly behind the tab. Gently bend the tab out towards you abd 1/16". This will create additional room for the drawer side tab to drop in behind it. Replace and the drawer and see if it locks. If it still won't stay locked, repeat the above procedure.

Caution: Bending the locking tab out more than 1/8" will allow the drawer track to "ride over" the tab, resulting in the drawer not properly locking.

Contributors: Linley Gumm, WxToad

Revised 8 Jul 11

Return to FAQ Index