Showing posts with label tires. Show all posts

Sunday, May 2, 2021

All About Tires


Tire Pressure The correct pressure to carry in your tires is probably the most misunderstood topic concerning vehicles. Let's start by stating the correct pressure is NOT the max pressure on the sidewall. Anyone that tells you different is full of it.

The correct pressure is determined by weighing each axle and consulting the tire manufacturer for the pressure for that weight. Search for 'suggested tire brand rv tire pressure'

Weighing the RV You need to know the weight on each wheel, each axle, and the all-up weight. The LD should be weighed with the gas and propane tanks full and the freshwater about 1/2 full and the storage tanks empty. All gear normally carried and all humans should be aboard for the weigh-in. You should seek out a segmented scale, rather than a platform scale. Commercial truck stations have such scales.

Knowing the axle weights you then refer to your tire manufacturer's recommended pressure for those weights.

Here's an illustration for Michelin XPS RIB's 


If the front axle weight is 4,200 and the weight is equally distributed left to right (and it should be reasonably close) then each tire is supporting about 2100 pounds so the proper pressure should be 60 pounds. 

If the rear axle weight is 9,600, then each tire is supporting about 2,400 pounds so the proper pressure should be 70 pounds.

(Note if the tires were arbitrarily set to 80 pounds each that would support over 15,000 pounds which exceeds the Ford chassis rating of 14,400. Expect wearing on the center of the tire)

Having the correct tire pressure was brought, almost forcibly, home to me after having Michelin XPS RIB's installed. I set the pressure according to the Michelin specs for my axle weights. Except I confused 55 with 65 in the front tires. This caused the front end to "float". The rig would wiggle around on the road above 50. It was fine without the Jeep, but the force of the Jeep on the rear end actuated the sway. After adding 10 pounds to get the correct pressure of 65 it returned to its normal tracks like a train mode.

I have heard many owners complain about sway. They added rear sway bars. I wonder if the sway bar just masked under inflation? I think I know the answer.


Tire Stems

Consider installing long, specially configured brass valves; these valves make checking tire pressure and airing the tires much easier! (These are NOT tire stem extenders, which many consider dangerous) They are available from several sources. Search for Borg valve stems. Today I see them at
https://www.shinyrv.com/product/dually-valve-stem-kit-for-class-c-ford-e350-e450-dl1ec-free-shipping/


Metal Valve Caps - Spend $5 and get them (Required on commercial trucks) Take them off when you get your tires changed as they will vanish)


ABOUT YOUR TIRES  (UPDATED 2022)


READING A LIGHT TRUCK TIRE SIDEWALL


Rub a piece of chalk over any markings that are difficult to see/read; the chalk makes the letters stand out.  


  • LT = light truck  (Not all “light truck” tires are appropriate for RV use!)  
  • 225/75R/16E is the tire size on the Ford E-450 chassis.  '225' is the tire’s width in millimeters.  '75' is the aspect ratio, i.e., the relationship of the sidewall height to the tire width; the sidewall height is 75% of the tire width.  'R' indicates a radial tire.  '16' is the diameter – inches – of the wheel (rim).
  • Load range relates to the maximum load an individual tire can carry; on LT tires, a letter indicates the load range, e.g., D or E.  
  • The maximum load capacity for the individual tire (stamped on the sidewall of the tire) is indicated as 'X' pounds when the tire is used as a single.
  • The tire’s maximum cold pressure is indicated near the maximum per-tire load ratings.
  • Tire markings vary according to the manufacturer, but the tire’s description/specs should include its intended use, e.g., commercial, highway all-season, etc
  • The number and composition, i.e., polyester or steel, of belts under the tread and plies in the sidewall are (usually) indicated near the tire size marking.  E load range tires should be 10-ply.
  • The date of manufacture of the tire is located in one of the 'DOT boxes', small rectangles containing the tire’s identification, serial number, etc.  Beginning with the year 2000, the manufacturing date is indicated by a four-digit number; the first two digits represent the week of manufacture, and the last two digits show the year of manufacture.  For example, '3519' means that the tire was made during the 35th week of 2019.


TIRE TIPS


     Tire Rack offers the most comprehensive, updated listings of available LT225/75R/16E tires. Search tire listing websites by tire size, not by vehicle.

https://www.tirerack.com

All-steel, i.e., steel mesh belting and sidewall reinforcement can be a good choice, but the selection is (currently) limited to two manufacturers. 

Michelin XPS Rib

Goodyear G947 RSS Armor Max, G949 RSA Armor Max


Tire wear patterns indicate over/underinflation, poor wheel alignment and balance, damaged wheels, and/or suspension problems.   
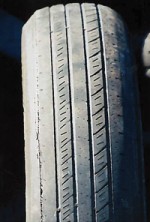
Over-Inflation Wear

Tire wear in the center of the tread pattern tells you that the inflation patterns are too high. Too much pressure can cause the contact patch to shrink and the center of the tire to carry all of the load.


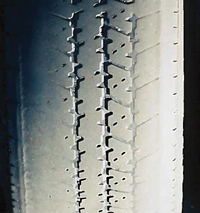
Under-Inflation Wear

Tire wear on the edges of a tire will typically indicate inflation pressures are lower than specified. When a tire is under-inflated, the contact patch grows and the load is carried by the outside edges of the patch.


Feathering

The indicator of excessive positive or negative toe angle is a feathering or scuffing that can be detected by stroking your fingertips across the edge of each tread bar or tread block. A feather edge on the inside of the tread bar indicates excess toe-in, while a feather edge on the outside of the tread bar indicates toe-out. Because the angle is affected by changes in camber and caster angles, it’s always the last angle to be adjusted during the wheel alignment process. In addition, any change in camber or caster angles will immediately change the toe angle. Toe angle geometry can also be greatly affected by changes in suspension height.

Scalloped

Cupped or scalloped dips appearing around the surface of the tread could indicate loose, worn, or bent suspension parts. Worn shock absorbers or unbalanced tires can also cause cupping, but the cupping would typically be more indicative of a concentric pattern. Shocks and struts are the most likely culprit because they provide damping force to control tire movement. When the tires move excessively, the scalloped pattern can appear. A lack of rotation can cause this condition.


Outer Edge Wear

Wear on the outer edge of a tire is rare these days, but it does happen. Positive camber, caster, and toe can lead to wear on the outer edge. If you see edge wear on one side, check the thrust and setback.

But, it should be noted, that the leading cause of outer edge wear on modern vehicles is over-enthusiastic cornering.


 Inner Edge Wear

Inner edge wear on tires is the most common problem most technicians see. The angles causing this type of wear are typically negative toe and camber. For parts, there are three component sources of the inner edge wear: bushings, springs, and loads.


  •  Bushings

Ozone, extreme temperatures, and other atmospheric issues tend to destroy rubber bushings and cause the alignment angles to change. Some vehicles have hydraulic bushings on the rear lower control arms. Some bushings will leak when they fail. When a bushing in the rear fails, the extra movement causes the wheels to toe out and the camber to go negative.

  •  Springs

As a suspension compresses and rebounds, the alignment angles change. Engineers tune alignment angles for a specific ride height to maximize handling and tire wear. If a spring can no longer support the vehicle, the alignment angles will suffer. Most engineers tune the suspension to toe out when the rear suspension compresses. This increases vehicle stability. But, it also causes the inner edge of the tire to wear. Springs are made of metal that is heat-treated but can still fatigue. This includes leaf, coil, and torsion bar springs. If you see a vehicle that needs considerable adjustments for camber on both wheels of the same axle, inspect the springs.

  • Loads

Loads in the rear of the vehicle will cause changes to the toe, caster, and camber in the front (and possibly the rear). The camber and caster will become positive in the front, and if the vehicle has an independent rear suspension, the camber will become negative and it will be toed out. This could lead to outside edge wear in the front and inside edge wear in the rear.

Chalk Test - You can visually determine if the tires are over or under-inflated with what is known as a chalk test. There are numerous YouTube and explanatory articles that can be found by searching for ‘chalk test’. All you need is a piece of chalk, an empty parking lot, the rig loaded as it would be going down the road and 15 minutes.


Use the recommended tire application, size, and load rating for your RV


    Look for the certification sticker on the door jamb of your LD; it contains information about tire size/type, recommended tire pressures, and tire weight capacities.


Light Truck is the somewhat confusing tire designation used for tires that are the appropriate size and application, i.e., designed for commercial or RV use, for your E-350/450 chassis.


Commercial grade/RV tires are often made of better grades of rubber, contain more UV and ozone protectants, and may have additional plies of polyester (or another material) in the sidewalls, and/or extra belts under the tread; these are usually steel 'mesh'. 


Use the appropriately-sized tire for your wheel.  Using even a slightly wider tire than the 225/75R/16E, i.e., a 2/5” larger 235/75R/16, reduces the amount of space between the duals.  Less space means excess heat build-up and possible blistering (and weakening) of the tires’ sidewalls.  


Also, 'non-spec' space between duals leads to possible contact between the duals when the tires flex during normal use; contact can cause the tires to 'scrub' and weaken the sidewall.  (And, the wider tire may not form a thorough seal when seated on the rim.) Never install a 16.5” (bead width) tire on a 16” rim, or vice versa.


Load rating E is the appropriate choice for the E-450 Ford chassis.  

Currently, Michelin, Goodyear, Bridgestone, Kumho, Toyo, and B.F. Goodrich are among several manufacturers that offer at least one LT/225/75R/16 E-load range tires that are appropriate for use on the E-450 chassis.  Check each manufacturer’s website for tire choices of the appropriate size, load rating, and application; the availability of tire models and applications changes frequently! 


Note:  The 'M+S' tire tread designation means that the tread grooves are wide and begin close to the outside edge of the tire; the wide tread grooves allow mud and snow to be thrown off more easily than from a narrow-grooved highway tire.  Sipes, usually hook-shaped or zig zag slits around the outer edge of the tire tread, provide increased traction on wet roads. M+S tires are not true snow tires; they are classified as all-season tires, suitable for a variety of road applications. 


        The most common causes of tire failures are overloading and underinflation.  


Weigh your coach, loaded and ready for the road, on all four 'axle corners'; the weight (of each corner of) your coach determines the inflation pressure(s) of your tires.  


All tires on the same axle should be inflated to the same pressure; if there is a weight discrepancy between the right and left side of the RV, air the tires to accommodate the higher weight.


Don’t exceed the maximum cold tire pressure, stamped on the tire sidewall (or the GVWR of your coach!)  If your weight indicates a tire pressure over 70 pounds, remove the rocks and scrap steel you are grossly overloaded.


     Load Rating Tables

Individual tire manufacturers’ websites offer tire care tips, application, size, load rating information, and inflation tables for their tires; check selections among LT225/75R/16E Examples of load rating tables.


https://www.michelinrvtires.com/reference-materials/load-and-inflation-tables/#/


www.goodyearrvtires.com/tire-inflation-loading.aspx


A closer look at a load range table. Using the Michelin XPS Rib as an example.


If the front axle weight is 4,600 pounds, then the proper inflation would be 65 pounds. (2,300 per tire x 2)

If the rear axle weight is 9,200 pounds, then the proper inflation would be 75 pounds.

(Note 4,600 + 9,200 is 13,800, the typical weight of a 26-foot going down the road with full gas, 2/3 water, and empty storage tanks)

Make sure you are typical and get it weighed.


TIRE MAINTENANCE


Inspect your tires regularly; don’t forget the inside duals!  Check the sidewalls for cracking, checking, bulges, tears or (excessively) scuffed areas.  (Also check the tire bead area for any gouges or shredded or missing rubber.)  Check the tread for tread depth, uneven wear, rocks or other road hazard debris, and any cuts or areas of missing rubber.


Tires deteriorate much more quickly when exposed to UV light and ozone in the air; wash tires with mild soap and water and rinse thoroughly.  Keep tires covered while the RV sits in storage or at a campsite.


Do not use tire dressings or vinyl/rubber treatments containing petroleum distillates, e.g., Armor All, on your tires or any vinyl or rubber surface; using these products can actually increase the rate of deterioration.  303 Aerospace Protectant is the good stuff!   https://www.goldeagle.com/brands/303-products/


RV tires should usually be replaced when the tires are about 5-6 years old, even if the mileage is low and the tread still appears good.  The sidewalls of RV tires are far more vulnerable to the effects of weight and wear than the tread, and time and exposure can deteriorate tires faster than use.


Tire Stores - You should seek one that normally handles larger vehicles. 


Install long brass valves; these valves make checking tire pressure and airing the tires much easier!  Search for dually tire valves or Borg tire valves.


http://yourtireshopsupply.com/category/796/dually-valve-kits is one source for these valves. These are NOT extensions, which can be dangerous.


Carry a reliable, accurate truck/RV tire pressure gauge that registers tire pressures up to about 100 pounds.  The pencil types are less accurate than numbered or digital read-out gauges.  Make sure that the gauge head is deep enough to allow a complete seal around the tire valve when you check the tire pressure.  Do not rely on the gas station or even tire shop gauges that are attached to the air hose; these are notoriously inaccurate.  


Make sure that the gauge selected is for truck/RV use, i.e.; the gauge needs to measure high enough pressures and be of a configuration that allows you to reach the valves to check the air pressure. I use an Accutire MS-4021B Digital Tire Pressure Gauge; see Amazon. Jayco is another quality vendor. A flexible hose is a plus.


Besides the gauge, other handy tire tools are a valve core tool, extra valve caps, an old (dull) screwdriver to pick rocks out of the tread, and a depth gauge measure.


Check your tires’ air pressure before each day’s driving; the tires have to be cold for an accurate reading.  'Eyeballing' does not substitute for using the gauge to verify correct tire pressures!


A laser digital thermometer is useful to quickly check tire pressure/temperature at a rest stop. You just walk around the rig and shoot all six tires noting the temperature. You will quickly learn what a normal temp is. The inside dual will always read a little higher than the outside.  80 to 120 degrees depending on ambient temp are normal.


Use metal valve caps to keep dirt, debris, and moisture out of the tire valves; these can damage the valve core and cause a slow leak.  The best 'air-through' valve caps are German-made V2B Alligators: 


https://shop.myerstiresupply.com/ERP2Web49/e2wItemMain.aspx?parentId=00083256


https://www.amazon.com/Alligator-V2B-Inflate-Through-Valve/dp/B014VCY3S2


Depending on speed, ambient temperature, and length of driving time, a tire can inflate to several pounds over its cold inflation (even exceeding the maximum) pressure.  This is normal; never bleed air from a hot tire.


Carrying a small 120V (or capable 12V) air compressor makes airing the tires much easier! 

400P-RV AutomaticPortable Compressor is an example.

https://www.viaircorp.com/portables/400p-rv-auto


If you use wooden or plastic blocks for leveling your coach, make sure that the blocks are wide enough and long enough to support the entire footprint of the tire!


https://trilynx.com/


Always block both rear duals when leveling the coach; never block just the outside dual.  


Air the spare to the maximum pressure listed on the sidewall.


Thursday, September 24, 2015

Tire Tread Wear

One normally sees abnormal tire tread wear on the front tires, where there are more places for something to get out of kilter affecting toe-in, camber, etc. Rear axles are presumed to be less of a problem. But a LD owner Mike Coachman recently discovered that there can be an issue with the rear axle:

Problem:
On the original Michelin tire set and more recently on the second set of Michelins the inside 3”+ of tread (closest to the differential) of the inside dual tires on both sides had worn considerably more than the rest of the tread. The outside dual tires showed even wear equal to the remaining tread on the tires in question. The Bilstiein shocks appeared to be in good condition (no leaking oil/ good rubber grommets).  Traveling gross weight is +/- 13,280-lbs.(front: 4080-lbs; rear: 9200-lbs -which is within gross weight rating -9500lb- of each axle).   Rear axle tire pressure was maintained at 75-lbs and the front at 60-lbs per the LD owner’s manual.  The owner tows a Honda CRV. Current mileage: 71,000-mi.

Solution: 
Mike took the motorhome to American Frame & Axle in Tampa, FL, for an evaluation of the tire wear problem described above.. Upon inspection they found that both axle housings were equally out of  camber by 0.4 degrees upward.  This explains the tire wear. Toe in/out was ok. Both wheel bearings were turning in their housing. The co-owner & service manager stated that these problems are now common with solid axles of every size vehicle up to the largest of semi tractors/trailers and has been so for about the last 25 years. Prior to that it was rare to find an axle out of true alignment. He attested it to poor manufacturing quality control. If it had been caused by overloading of the axle or severe shock on the road, the out of alignment would not have been equal as was found. The service manager said it was better to fix the axle than replacing it. He said that often a new replacement axle can have the same (or worse) problem.

The rear axle was removed, placed in a press made specifically for this purpose and re-aligned. Bearings were replaced, the axle housings were re-welded to the differential housing, and a complete front to back axle/wheel alignment was completed. The worn tires were rotated to the outside position. Even though this was a manufacturing problem, this coach was well out of warranty. 


Contributor: Mike Coachman

Submitted: 24 Sep 2015
 

Thursday, July 28, 2011

Tires for Your Lazy Daze

This is one person’s opinion about tires, but the opinion is shared by many owners.

I have used Michelin LT tires on several vehicles in 30 years of RVing. They have never given me any trouble. They can last for 60,000 miles. I would not consider any other brand.

The size used for the E450 is 225/75R/16 Load range E.

I like the LTX M/S, an all weather tire with the best fuel economy and comfort rating of any tire in the class. Some folks want more sidewall protection and get the ribbed version, but ride comfort drops.

Most people consider 5 years the max life for a tire, no matter how much tread is left.

Your tires will last longer if you weigh your rig and follow the Michelin inflation pressure for the weight on each axle. The max inflation pressure stamped on your tire is NOT the correct pressure – unless your axle weigh requires it.

Monday, May 30, 2011

Tire Pressure

The correct pressure to carry in your tires is probably the most mis-understood topic concerning vehicles. I suggest you carefully read what Michelin says about tire pressure. They know more about tires than you, your friends or the mechanic you trust.


Now that you understand that the number printed on the tire does not mean that your tires should be carrying that pressure, you are prepared to determine what pressure you should carry by reading this topic.


Wednesday, February 2, 2011

About Your Tires

ABOUT YOUR (E-450 FORD CHASSIS) TIRES…!

READING A “LIGHT TRUCK” TIRE SIDEWALL…

Rub a piece of chalk over any markings that are difficult to see/read; the chalk makes the letters stand out and doesn’t hurt the tire. Sidewall reading “how-to” for passenger car and light truck tires:

http://www.tirelitigation.com/sidewall_markings.html

  • LT” = “light truck”, but not all “light truck” tires are appropriate for RV use!

  • “225/75R/16” is the tire size on the Ford E-450 chassis. “225” is the tire’s width in millimeters. ”75” is the “aspect ratio”, i.e., the relationship of the sidewall height to the tire width; the sidewall height is 75% of the tire width. “R” indicates a “radial” tire. “16” is the diameter – inches – of the wheel (rim).

  • “Load range” relates to the maximum load an individual tire can carry; on LT tires, a letter indicates the load range, e.g., “D” or “E”.

  • The maximum load capacity for the individual tire (stamped on the sidewall of the tire) is indicated as “X” pounds when the tire is used as a single, and “X” pounds when used as a double; the Xs aren’t the same weights!

  • The tire’s maximum cold pressure is indicated near the maximum per-tire load ratings.

  • Tire markings vary according to the manufacturer, but the tire’s description/specs should include its intended use, e.g., commercial, “highway all-season”, etc.

  • The number and composition, i.e., polyester or steel, of belts under the tread and plies in the sidewall are (usually) indicated near the tire size marking. “E” load range tires should be “10-ply”.

  • The date of manufacture of the tire is located in one of the “DOT boxes”, small rectangles containing the tire’s identification, serial number, etc. Beginning with the year 2000, the manufacturing date is indicated by a four-digit number; the first two digits represent the week of manufacture, and the last two show the year of manufacture. For example, “3506” means that the tire was made during the 35th week of 2006.

TIRE TIPS…

ê The Rubber Manufacturers’ Association’s website offers information for all aspects of RV tire care and RV weights/weighing:

http://www.rma.org/tire_safety/tire_maintenance_and_safety/tire_safety_brochure/rv_tire_care_and_safety.cfm (Or, use “TinyURL”: http://tinyurl.com/6lgsy)

ê Individual manufacturers’ web sites offer application, size and load rating information for their tires; examples:
www.goodyear.com/rv
www.goodyear.com/cfmx/web/truck/search.cfm
www.bridgestonetire.com/tireselector/Size_BS_EN.aspx
www.michelinrvtires.com/michelinrv/index.jsp

ê www.tirerack.com/ and www.1010tires.com/ list many manufacturers’ tires according to size, load rating, application, costs, etc.
ê Look for the “certification” sticker on the door jamb of your LD; it contains information about tire size/type, recommended tire pressures, and tire weight information.

ê Use the recommended tire application, size and load rating for your RV.

Light Truck” is the somewhat confusing tire designation used for tires that are the appropriate size and application, i.e., designed for “commercial” or “RV” use, for your E-350/450 chassis. These tires are usually made of better grades of rubber, contain more UV and ozone protectants, and may have additional plies of polyester (or another material) in the sidewalls, and/or extra belts under the tread; these are usually steel “mesh”.

Use the appropriately-sized tire for your wheel. Using even a slightly wider tire than the 225/75R/16, i.e., a 2/5” larger 235/75R/16, reduces the amount of space between the duals. Less space means excess heat build-up and possible “blistering” (and weakening) of the tires’ sidewalls. Also, “non-spec” space between duals leads to possible contact between the duals when the tires flex during normal use; contact can cause the tires to “scrub” and weaken the sidewall. (And, the wider tire may not form a thorough seal when “seated”.) Never install a 16.5” (bead width) tire on a 16” rim, or vice versa.

Load rating “E” is the appropriate choice for the E-450 Ford chassis. All-steel, i.e., steel mesh belting and sidewall reinforcement is the best, but the choices are limited. These currently-available all-steel, i.e., steel belts under the tread and steel-reinforced sidewalls, are the choices for tire replacement for 225/75R/16 E tires:

Michelin XPS “rib”
Goodyear G947RSS (M+S tread), G949RSA (“highway” tread)

Currently, Michelin, Goodyear, Bridgestone, Kumho, Toyo, and B.F. Goodrich are among manufacturers who offer at least one LT/225/75R/16 E-load range tires that are appropriate for use on the E-450 chassis. Check each manufacturer’s website for tire choices of the appropriate size, load rating, and application; availability of tire models and applications changes frequently!

ê The most common causes of tire failures are overloading and underinflation.

Weigh your coach, loaded and ready for the road, on all four “axle corners”; the weight (of each corner of) your coach determines the inflation pressure(s) of your tires.

All tires on the same axle should be inflated to the same pressure; if there is a weight discrepancy between the right and left side of the RV, air the tires to accommodate the higher weight.

Don’t exceed the maximum cold tire pressure, stamped on the tire sidewall, or the GVWR of your coach.

ê Tire manufacturers’ web sites offer load and inflation tables for their tires. For example, see:

www.michelinrvtires.com/michelinrv/tires-retreads/load-inflation-tables.jsp
www.goodyear.com/rv/pdf/rv_inflation.pdf
www.bridgestonetrucktires.com/us_eng/rv/index.asp (PDFs available for download; load/inflation tables and more)

Note: The “M+S” tire tread designation means that the tread grooves are wide and begin close to the outside edge of the tire; the wide tread grooves allow mud and snow to be “thrown off” more easily than from a narrow-grooved “highway” tire. M+S tires are not true “snow tires”; they are classified as “all-season” tires, suitable for a variety of road applications.

TIRE MAINTENANCE…

ê Inspect your tires regularly; don’t forget the inside duals! Check the sidewalls for cracking, “checking”, bulges, tears or (excessively) scuffed areas. (Also check the tire bead area for any gouges or shredded or missing rubber.) Check the tread for tread depth, uneven wear, rocks or other “road hazard debris”, and any cuts or areas of missing rubber.

ê Tires deteriorate much more quickly when exposed to UV light and ozone in the air; keep tires covered while the RV “sits” in storage or at a campsite.

ê Do not use “tire dressings” or vinyl/rubber treatments containing petroleum distillates, e.g., Armor All, on your tires or any vinyl or rubber surface; using these products can actually increase the rate of deterioration. (“303 Aerospace Protectant” is the good stuff! www.303products.com/)

ê RV tires should be replaced when the tread depth reaches 1/8” or the tires are over 5-6 years old, even if the mileage is low and the tread still appears “good”. (Time and exposure can deteriorate tires faster than use.)

ê Consider installing long, specially configured brass valves; these valves make checking tire pressure and airing the tires much easier! Two sources of “extended” valves are:

www.ridgecrest.ca.us/~tire-man/default.html and www.borgtiresupply.com

ê Carry a reliable, accurate ‘truck/RV’ tire pressure gauge that registers tire pressures up to about 100 pounds. The ‘pencil’ types are generally less accurate than ‘numbered’ or digital read-out gauges. Make sure that the gauge head is deep enough to allow a complete “seal” around the tire valve when you check the tire pressure. Don’t rely on the gas station or even tire shop gauges that are attached to the air hose; these are notoriously inaccurate.

www.getagauge.com/ and www.wheelmasters.com/gauges.html are two sources of gauges. Make sure that the gauge selected is for truck/RV use, i.e.; the gauge needs to measure high enough pressures and be of a configuration that allows you to reach the valves to check the air pressure. Don’t skimp on quality.

Besides the gauge, other handy “tire tools” are: a valve core tool, extra valve caps, an old (dull) screwdriver to pick rocks out of the tread, and a depth gauge measure.

ê Check your tires’ air pressure before each day’s driving; the tires have to be ‘cold’ for an accurate reading. (“Eyeballing” doesn’t substitute for using the gauge!)

Always use valve caps to keep dirt, debris, and moisture out of the tire valves; these can damage the valve core and cause a slow leak.

ê Depending on speed, ambient temperature, and length of driving time, a tire can inflate to several pounds over its cold inflation (even exceeding the maximum) pressure. This is normal; never ‘bleed’ air from a hot tire.

ê Carrying a small 120V air compressor makes airing the tires so much easier!

ê If you use wooden or plastic “blocks” for leveling your coach, make sure that the blocks are wide enough and long enough to support the entire footprint of the tire!

Always block both rear duals when leveling the coach; never block just the outside dual.

ê Air the spare to the maximum pressure listed on the sidewall.
WHAT WHEEL ALIGNMENT TERMS AND TIRE WEAR PATTERNS MEAN…

(Illustrations and text from http://www.justtires.com/)

Note: The diagrams and accompanying information below are no longer available on the Justtires website!

Wheel Alignment Terms

Wheel alignment refers to how flat your tires sit on the ground, and how straight they are pointed down the road. In technical terms, your vehicle’s wheel alignment can be measured in terms of (1) camber, (2) toe, and (3) caster.

Camber refers to how flat your tires sit on the ground. Over time your vehicle’s suspension gets weaker and your vehicle actually begins to slowly sag. As this happens your tires can start to ride on the inside or outside edge. This is referred to as positive and negative camber. The result of positive and negative camber is usually very fast tire wear on the edge of the tire. It can also result in poor steering and handling.

Toe refers to how straight your wheels are pointed down the road. Wheels that point slightly in towards each other have "toe in." Wheels that point slightly out away from each other have "toe out." When your wheels have significant positive or negative toe, your tires are literally dragged down the road. The result is often fast tire wear, or uneven tire wear which results in tire noise.

Caster is the orientation of the wheel on the axle. Imagine standing to the side of your vehicle and looking at the wheel and its position within the fender or wheel-well. If your wheel was pushed towards the front of the wheel-well it would have positive caster. If your wheel was pushed towards the back of the wheel-well it would have negative caster. Your vehicle was designed with a specific caster. As the caster changes your vehicle’s steering and handling can be affected.

Tire Wear Guide
The following Tire Wear Guide will help you identify the causes and solutions of most common tire wear patterns.
Wear Pattern
Cause
Solution
Center Wear
Over Inflation
Adjust pressure to particular load per tire catalog
Edge Wear
Under Inflation
Adjust pressure to particular load per tire catalog
Side Wear
Loss of camber or overloading
Make sure load doesn't exceed axle rating. Correction is 3/4 - 1 degree positive camber (top of wheel rim 3/16" further out than bottom.
Toe Wear
Incorrect toe-in
Correct toe-in is 0 - 1/2 degree.
Cupping
Out-of-balance
Check bearing adjustment and balance tires.
Flat Spots
Wheel lockup & tire skidding
Avoid sudden stops when possible and adjust brakes.

ê It may be advisable to rotate front tires every 5000 miles or so, but if the tires on your vehicle are wearing evenly, i.e., if all wheels are balanced and in correct alignment, rotating rear duals may not be necessary. If you choose to rotate all the tires, follow the 6-wheel rotation pattern pictured on the Rubber Manufacturers’ web site or the recommendation from your tires’ manufacturer.


Informative video by Michelin on tires, leveling and weighing.

Contributor: JC Taylor